launching a Leprechaun robot in 5 steps

This guide will help you quickly start trading with the Leprechaun bot on the Forex market in just 5 steps.
Leprechaun bots are free, to activate you only need to open a trading account with the RoboForex broker on which the bot will be traded, write the affiliate code wins when opening the account. After opening a trading account, bots are automatically activated for this account within a minute.
-
Step 1: Register with a broker
1.1 Registration with a broker
If you already have a personal account on RoboForex, then skip this step and go to Step 2: Opening a trading account.
You may have noticed that on the site I indicate two affiliate codes mstk and wins, which may possibly confuse you.
To register an account on RoboForex, use the affiliate code mstk, in which case you will be included in my 5-level affiliate program and will be able to build your affiliate network deep into mine using Leprechaun robots and this site with training for your partners.
If you just want to trade and you already have an account on RoboForex, then to open trading accounts use the wins affiliate code, this will activate the Leprechaun bots for your account.
mstk - for account registration!
wins - to open a trading account!
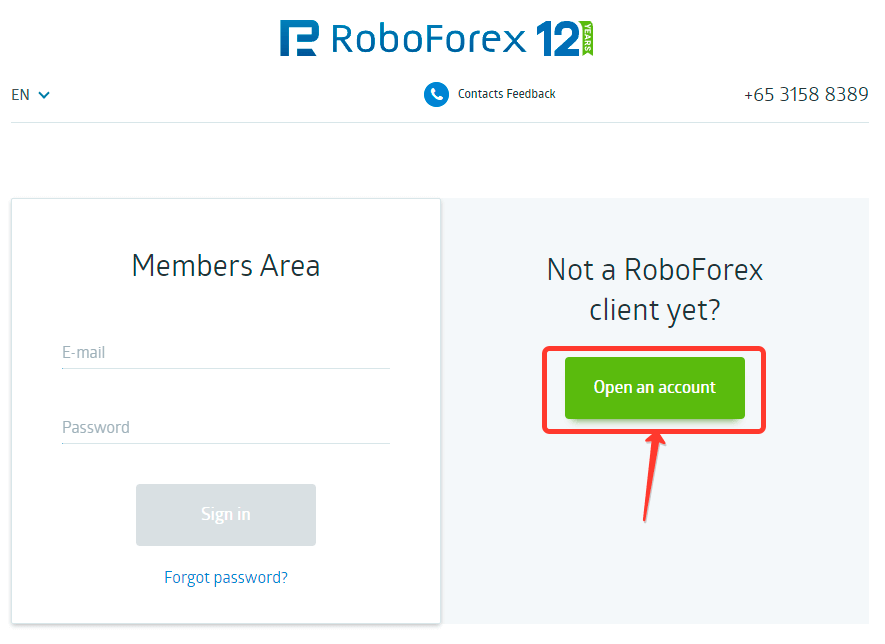
To register an account, follow the affiliate link: https://my.roboforex.com/en/?a=mstk
On the page that opens, click the "Open an account" button.
In the registration form, fill in your Email, First Name, Last Name, Phone Number.
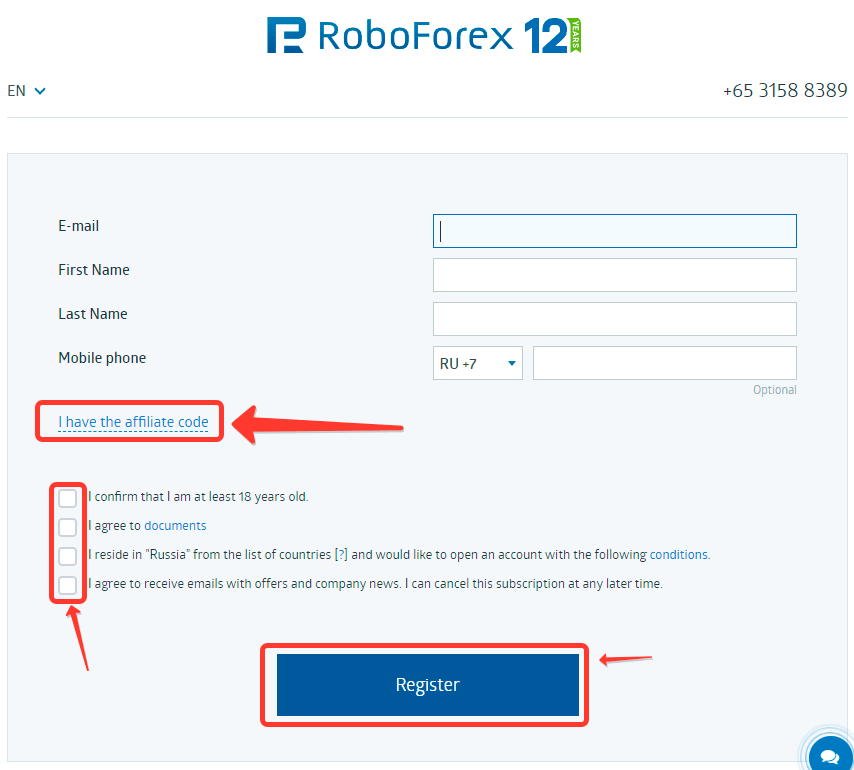
In the form, click on the link “I have the affiliate code” and in the “Affiliate code” field that appears, enter the partner code, four letters: mstk
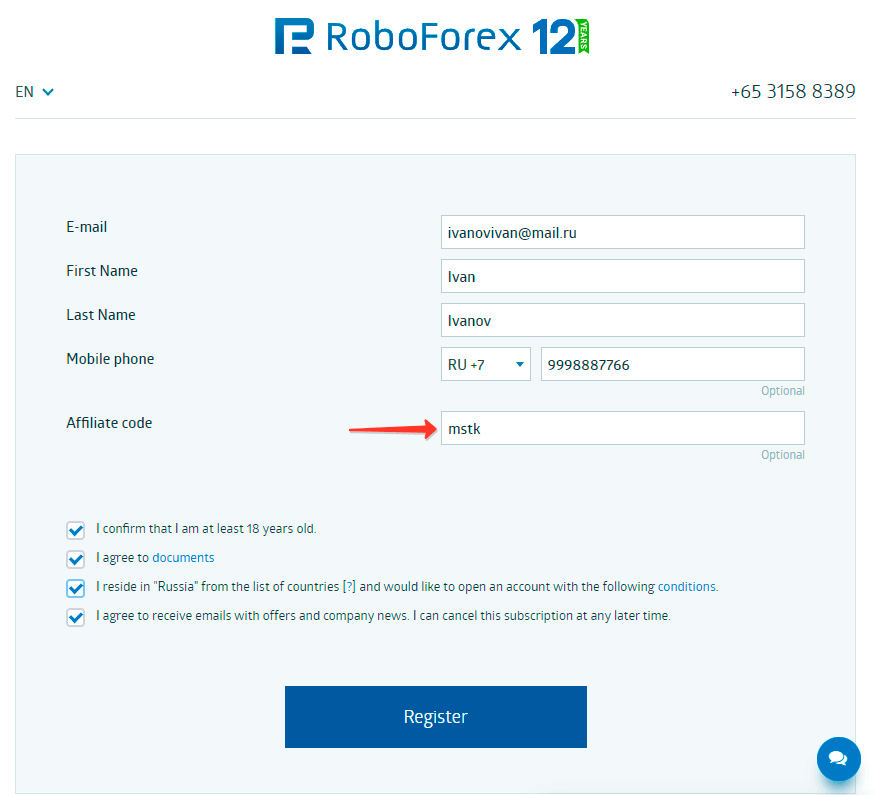
Once everything is filled out, click the "Register" button.
On the next page you will receive a notification “You have successfully registered! We have sent your credentials to your email address. Check your Spam folder if you do not see our message.”
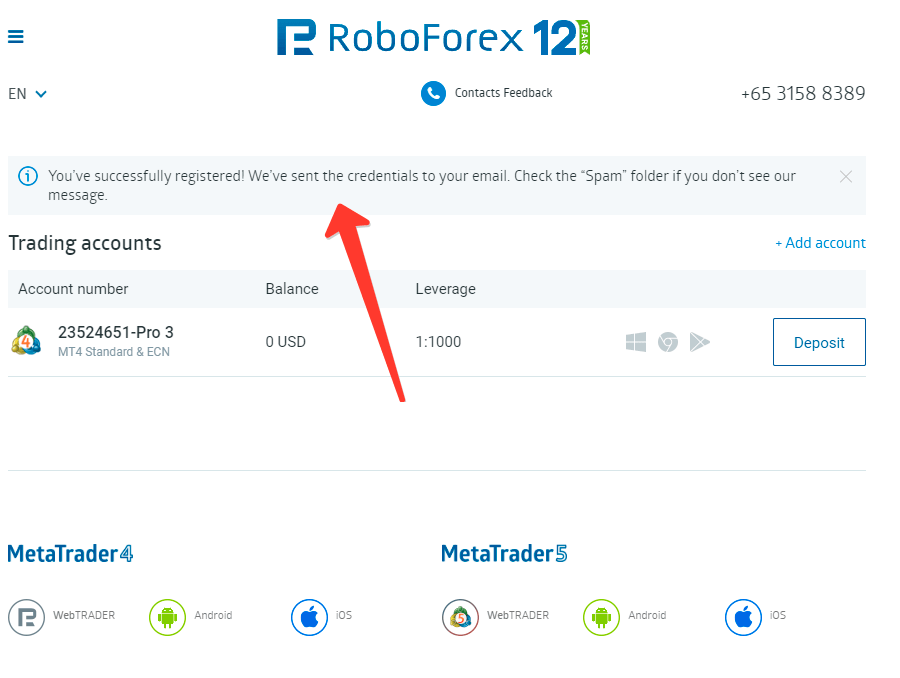
Congratulations! Registration is now complete! Check the email credentials that you will need to log into your personal account, keep them in a safe place!
1.2 Verification
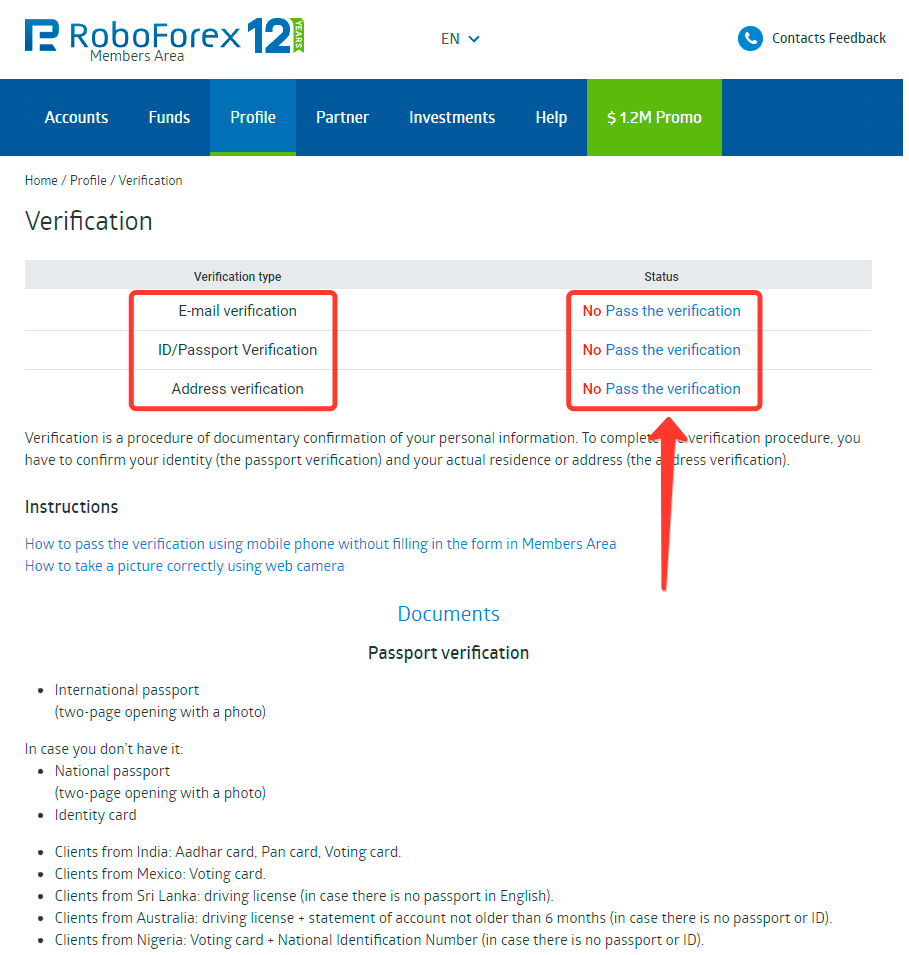
Next, you need to go through verification - a procedure for documenting your identity. This is necessary so that you can withdraw funds from your trading account, for example, to your bank card.
To complete the verification procedure, you need to confirm your identity (passport verification) and your actual place of residence or address (address verification). This is a standard procedure that all brokers have. You need to upload documents. As a rule, the verification takes place within one day.
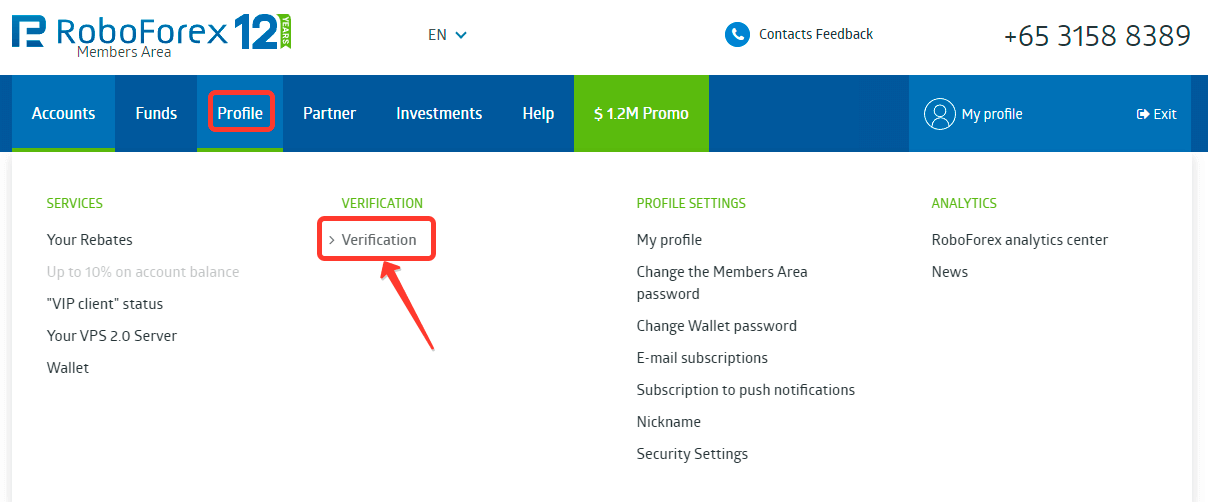
To undergo verification, select the "Profile" item in the main menu and the "Verification" item in the drop-down list
Upload the required documents.
Right now, without waiting for the verification procedure to complete, you can open a trading account, top it up with funds and trade. To do this, proceed to the next step of the guide - Step 2: Opening a trading account
Go to the RoboForex broker website using the link: Account registration.
-
Step 2: Opening a trading account
2.1 Opening a trading account
There are no restrictions on the activation of Leprechaun robots based on the number of accounts. You can open an unlimited number of accounts for trading Leprechaun robots. You must understand that one account can only be used to trade one version of the Leprechaun robot. If you want to trade several versions of the Leprechaun robot, you will need to open several trading accounts for this, as well as install several trading terminals, because In the terminal you can connect to only one trading account at a time.
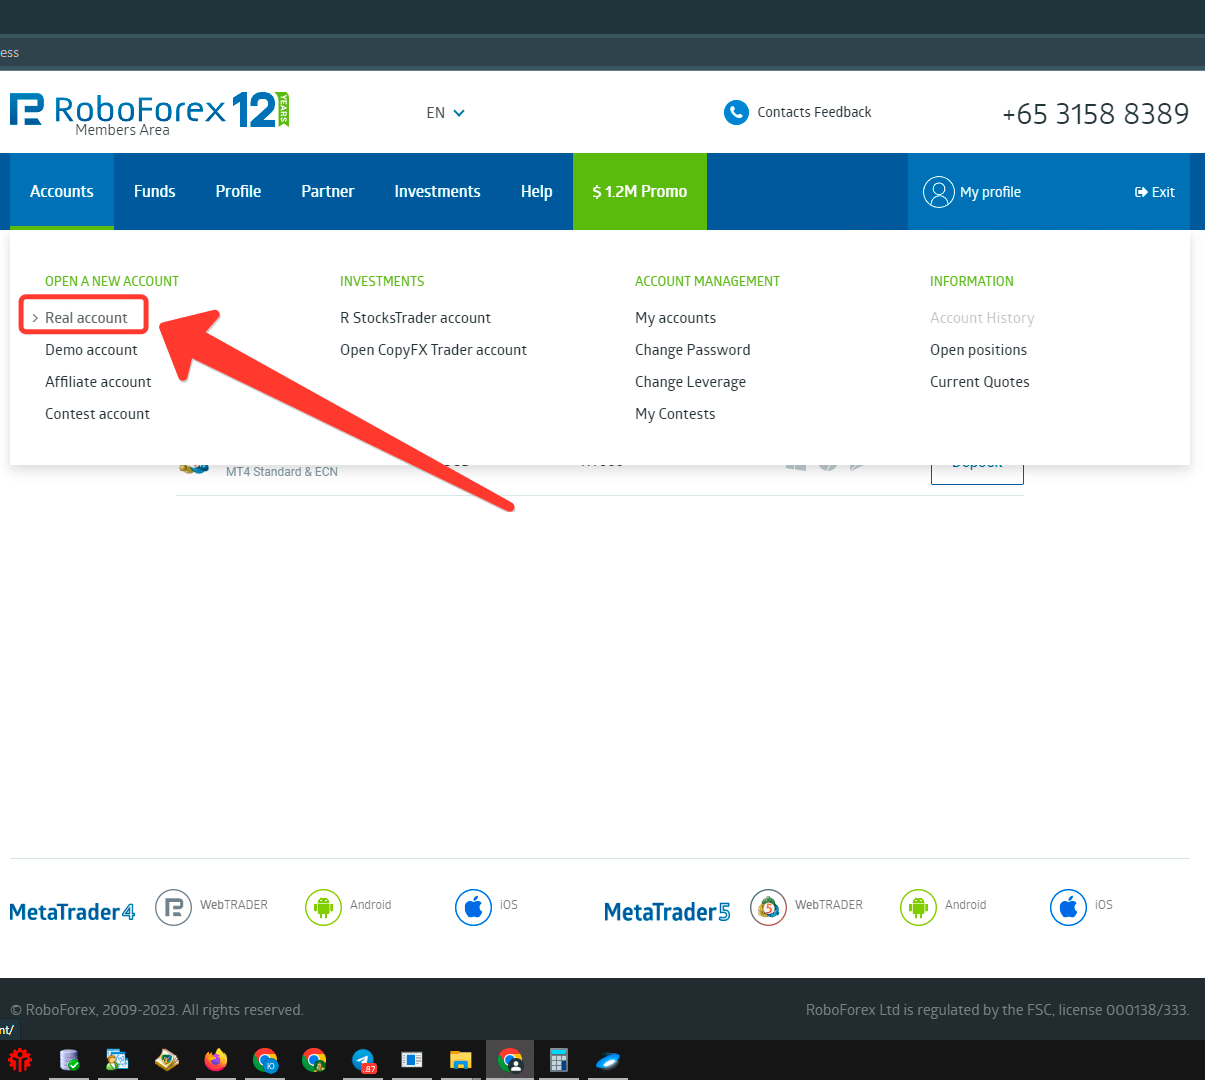
To open a trading account, select "Accounts" in the main menu and select the "Real account" menu item in the drop-down menu.
In the form fields, select the trading account parameters as shown in the screenshot. Create a password for your account. Be sure to enter the affiliate code in the "Affiliate code" field: four letters without a dot - wins. Otherwise, the bot will not be automatically activated for this account.
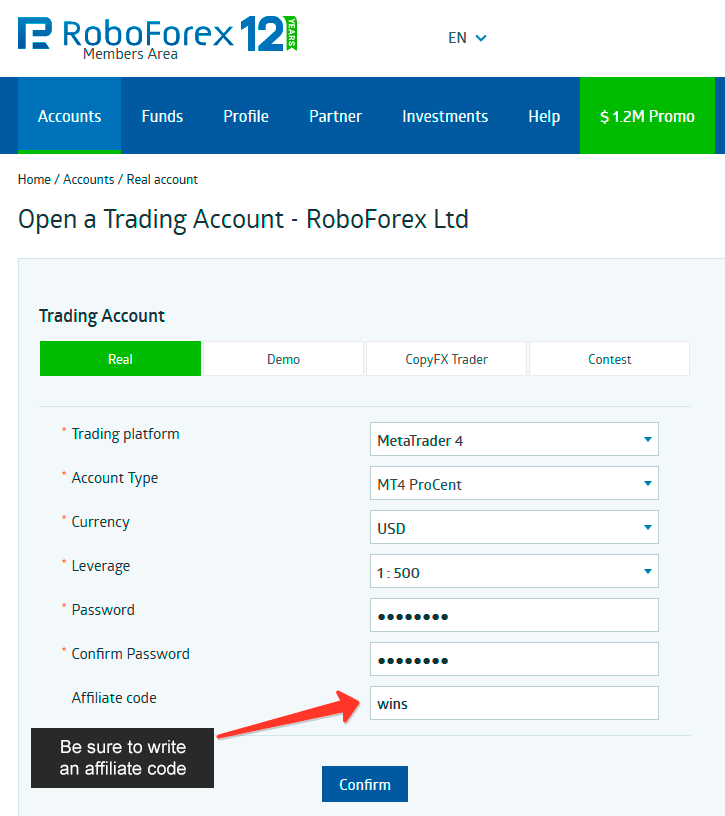
After filling out the form fields, click the "Confirm" button.
If you open a trading account before completing the verification procedure, the account opening form will have several more fields: Country, City, Address, Postal Code. Fill them out, they are required. If verification is passed, such fields will not appear when opening an account.
On the next page you will be provided with information to connect to your trading account: server name, login (account number) and your password. This data will also be sent to your mailbox.
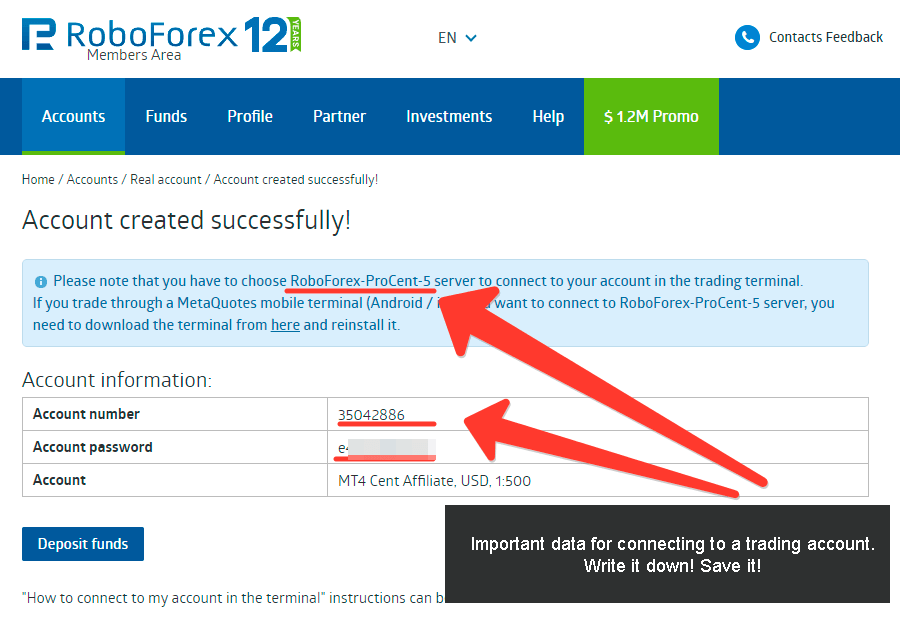
Attention! Be sure to take note of the server name. To connect to your account, in addition to your login and password, you also need to specify the server name!
2.2 Replenishment of trading account
The methods of depositing funds to a trading account with a RoboForex broker change periodically. You can view the list of available methods in your personal account, in the corresponding menu item Funds -> Deposit Funds.
-
Step 3: Register and rent a VPS
3.1 Register and rent a VPS
For the bot to work properly, the terminal with the bot must be open 24 hours a day, 7 days a week (trading of the main trading instruments takes place 5 days a week).
You can, of course, run a terminal with a bot on your home PC, but this is a bad idea for many reasons, such as: the PC will exhaust its resource 24/7, electricity bills will increase, the electricity in the house may be turned off, the bot will stop working, open transactions will remain without supervision and the deposit will be lost.
For uninterrupted operation of the terminal with the bot, remote VPS servers are used. In simple words, you rent someone else’s computer and remotely you can do almost everything on it that you can do on your home PC.
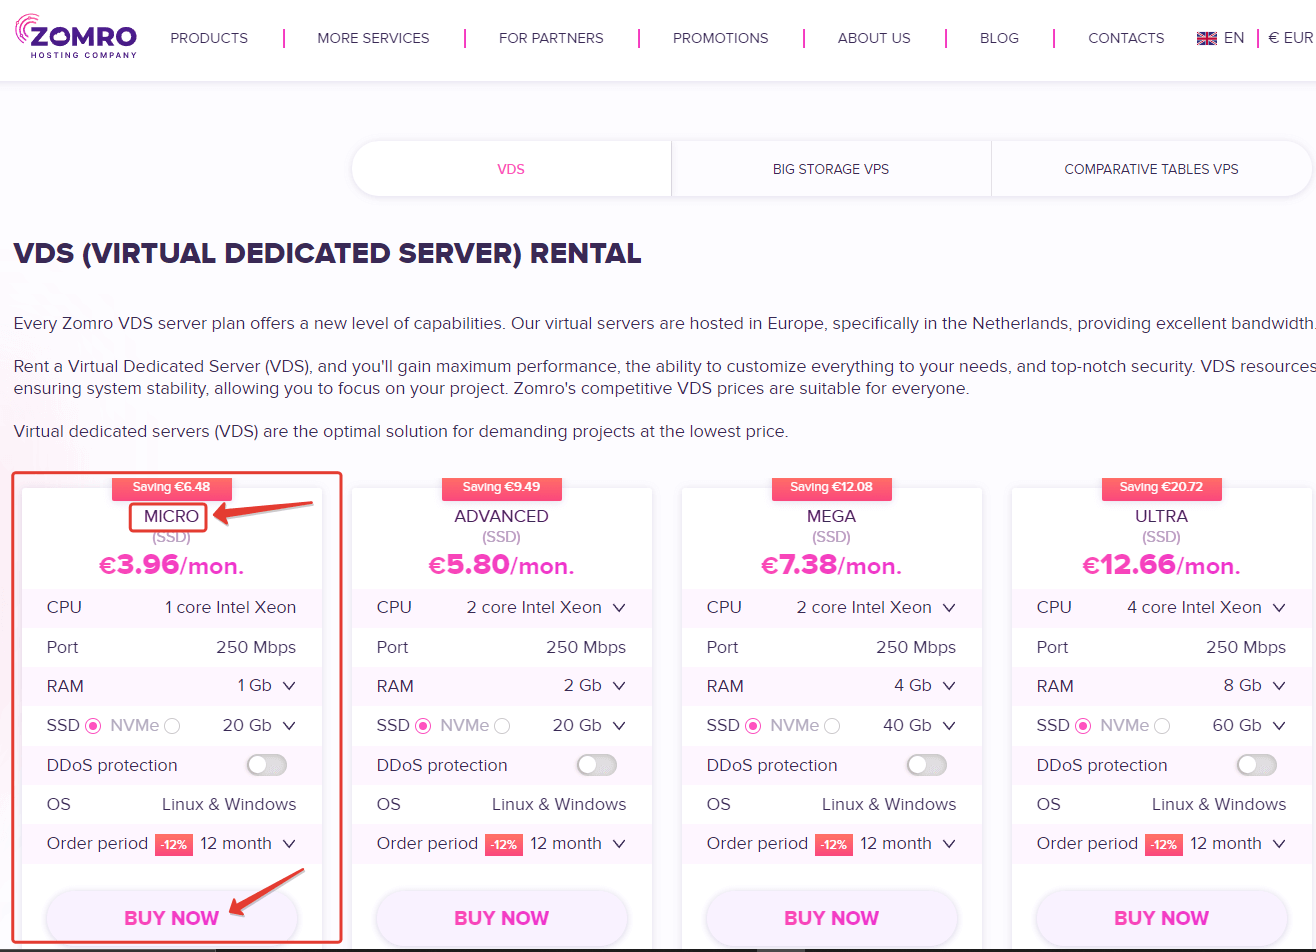
The cost of VPS is low, today you can rent a VPS for $4.5 dollars per month, and if you pay for the year at once, only $3.96 dollars per month.
I recommend that you use a time-tested, cheap, reliable VPS service with an affiliate program. VPS server for 1 terminal for only $4.5 (MICRO tariff), for five terminals for only $6.59 ( ADVANCED tariff). I use this VPS myself and my partners too.
Go to the VPS service website using the link: Rent VPS.
On the VPS service website, select VDS (VIRTUAL DEDICATED SERVER) with the MICRO tariff if you need a server for one trading terminal. Click the "BUY NOW" button.
On the next page you need to select server parameters.
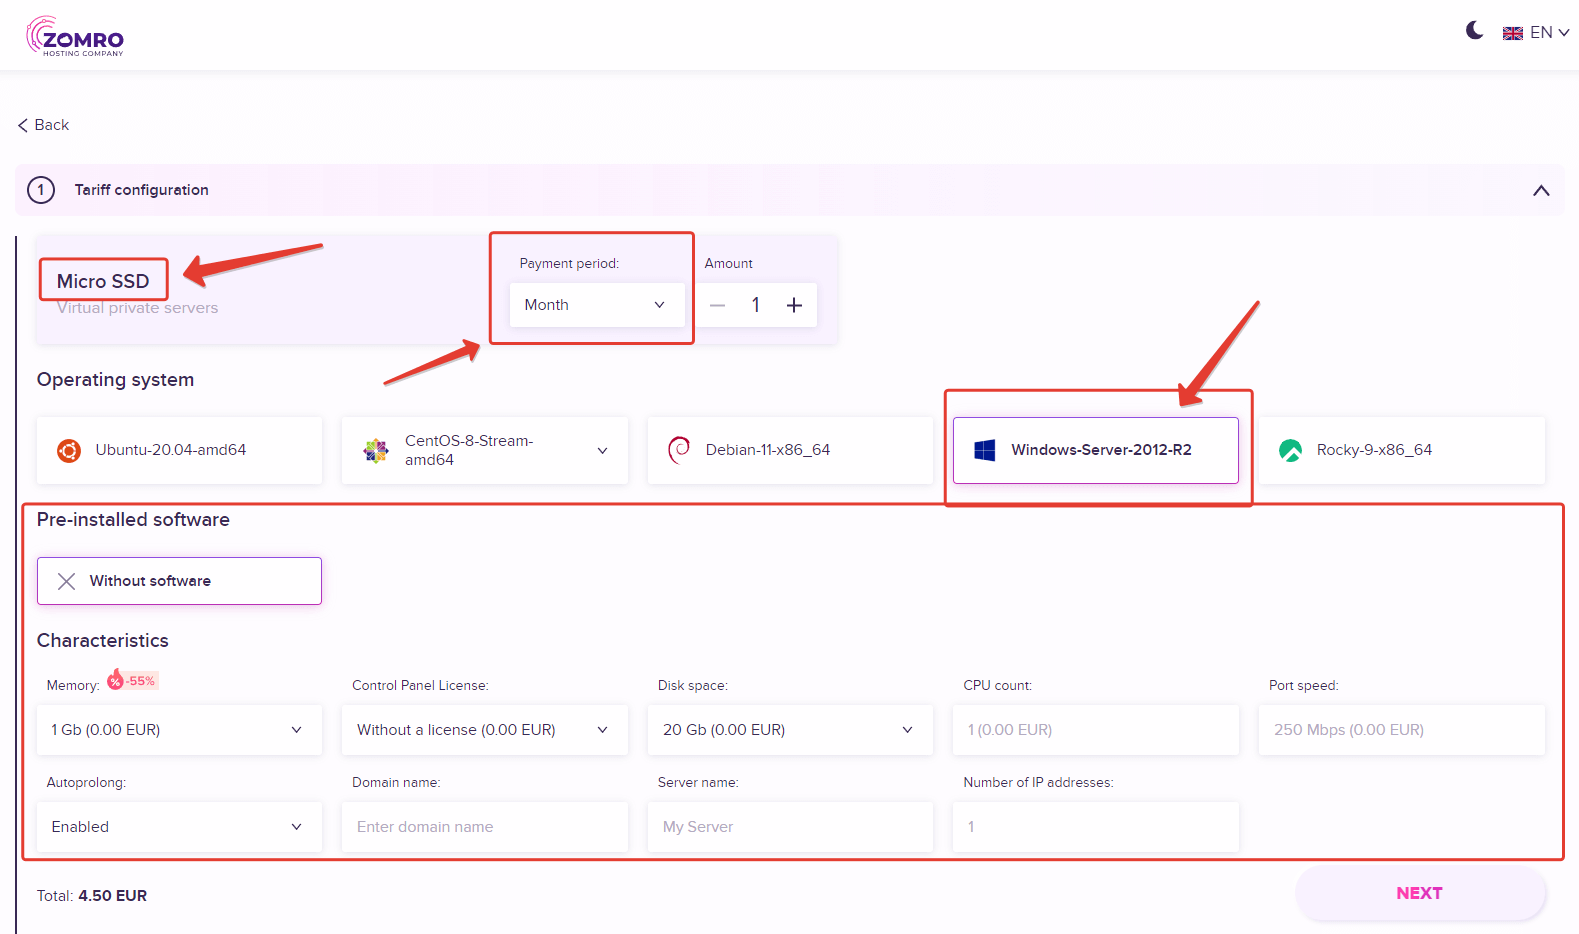
Select Payment period for how long you plan to buy the server. You can choose 1 month and then pay for renewal every month or buy immediately for a year at a discount.
Operating system select Windows-Server-2012-R2
There is no need to select all other parameters, they will be the same by default as you see in the picture.
Go through the next steps of renting a server yourself, there are no more technical issues there.
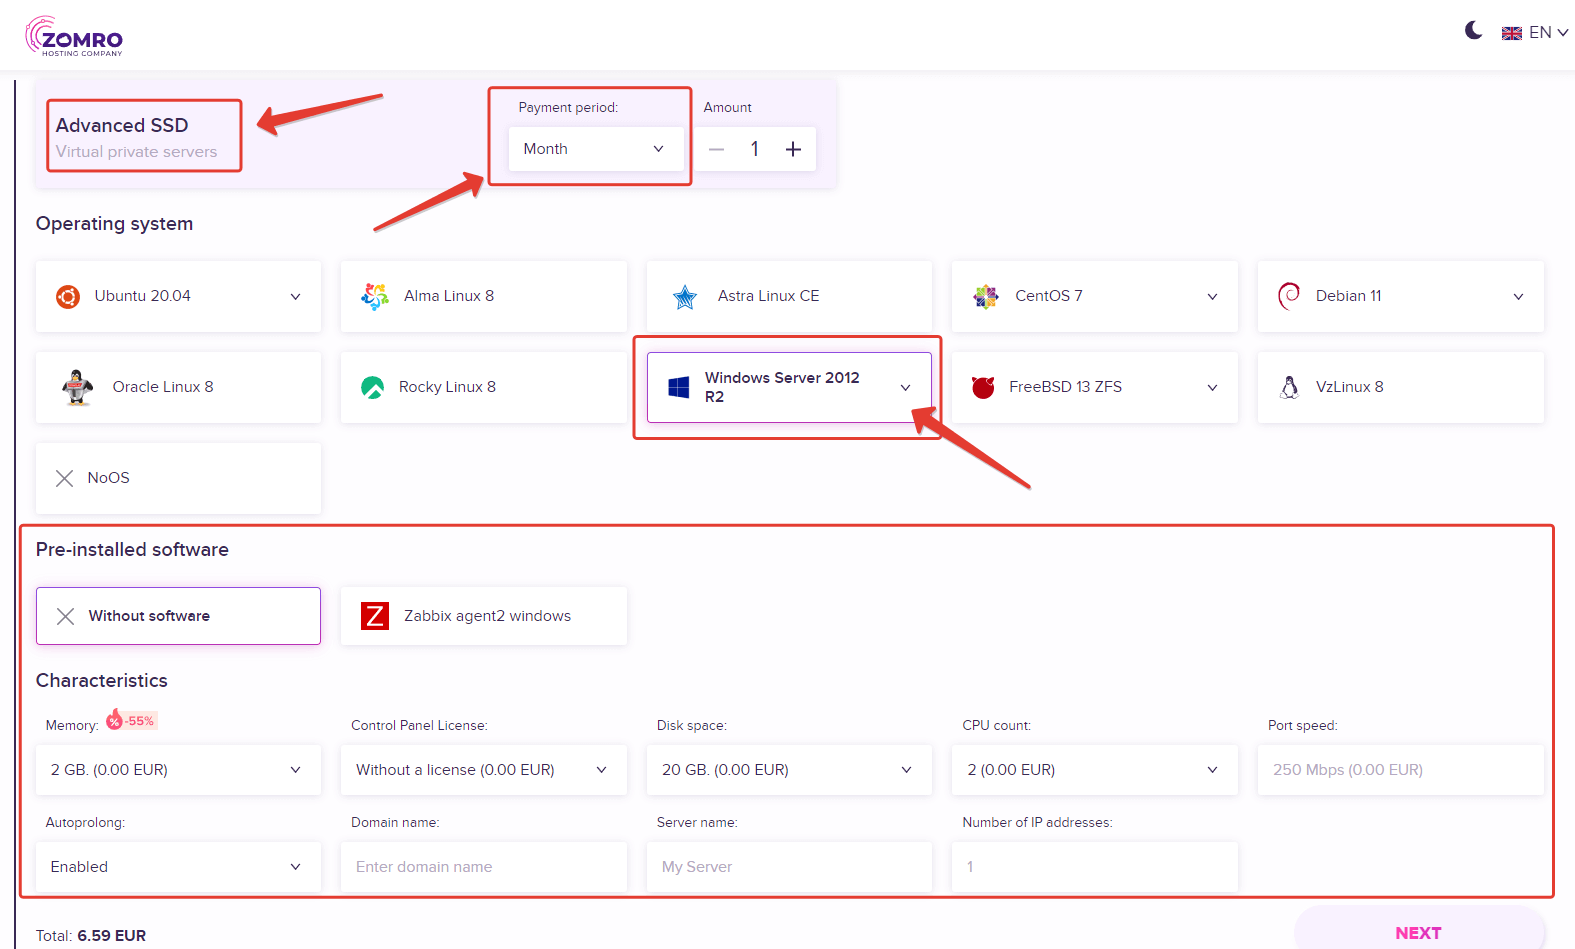
I use the ADVANCED tariff, which has enough resources to operate five trading terminals. If you want to choose such a tariff, then select the server parameters as shown in the picture below.
Link to VPS website: Rent VPS.
-
Step 4: Installation and configuration of the trading terminal
4.1 Download the current version of the trading terminal
In your RoboForex personal account at the bottom of the page, find the link to download the MetaTrader4 trading terminal and click on it. Or go to this address https://my.roboforex.com/en/help/download-center/
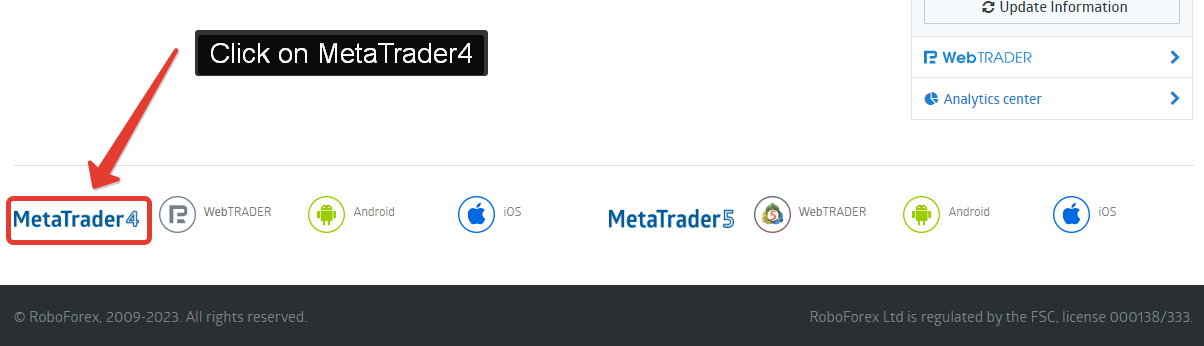
Once on the page for selecting the version of trading terminals, select the “MetaTrader4 for PC” option and click on the “Download” link.
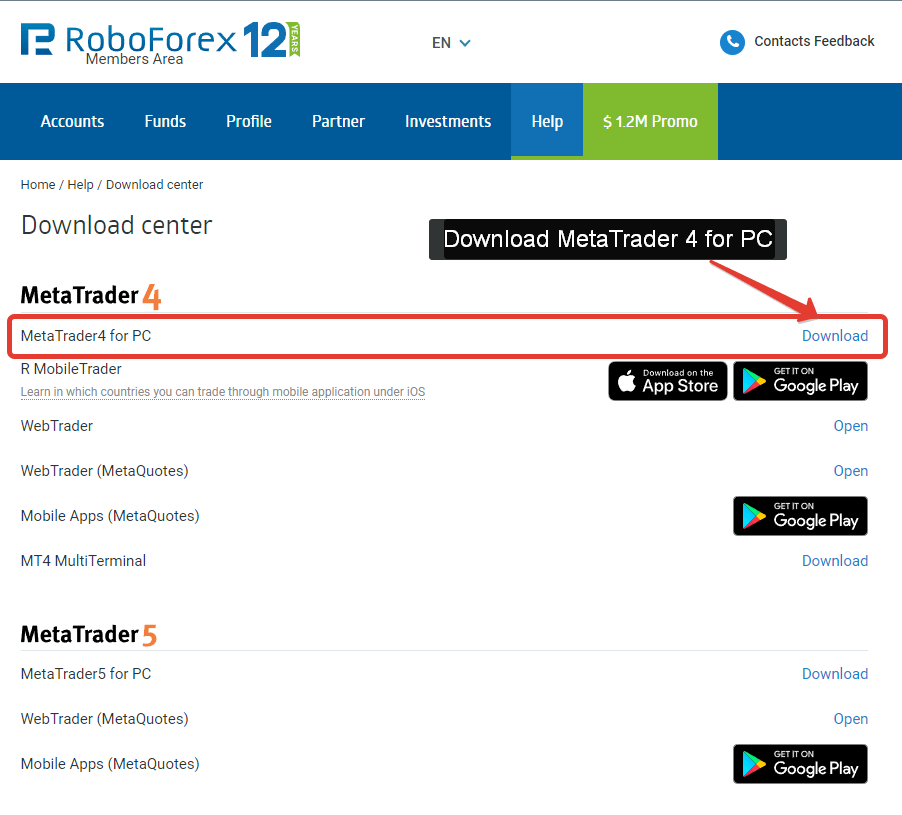
The MetaTrader4 terminal installation file "roboforex4setup.exe" will download to your computer.

4.2 Setting up a connection to the VPS server
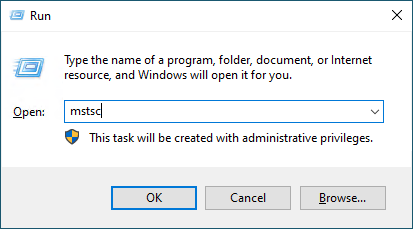
Now let's go to the remote computer, our purchased VPS server. To do this, on your keyboard, press the WIN keys (Microsoft checkbox button) + R. The Run window will appear. Enter the command "mstsc" as in the screenshot and click "OK".
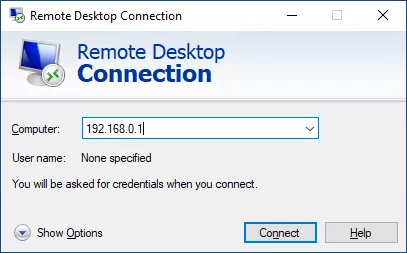
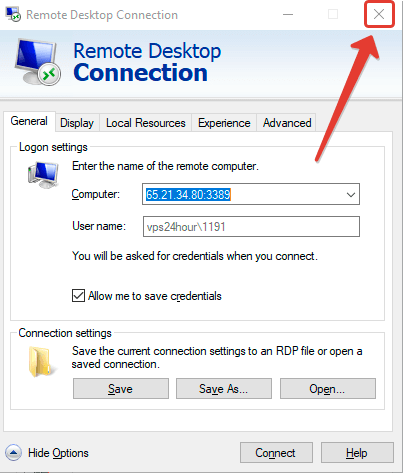
The "Remote Desktop Connection" window opens. Enter the server IP as indicated in the provided data to access the VPS. And click "Connect".
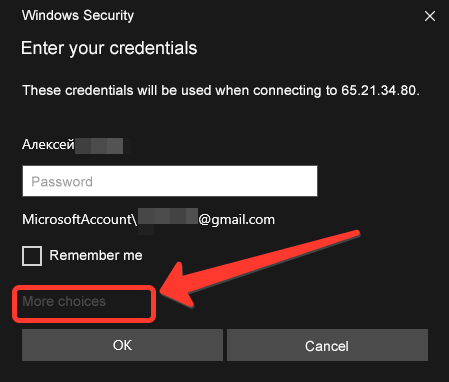
The "Enter your credentials" window appears. Click on the "More choices" link.
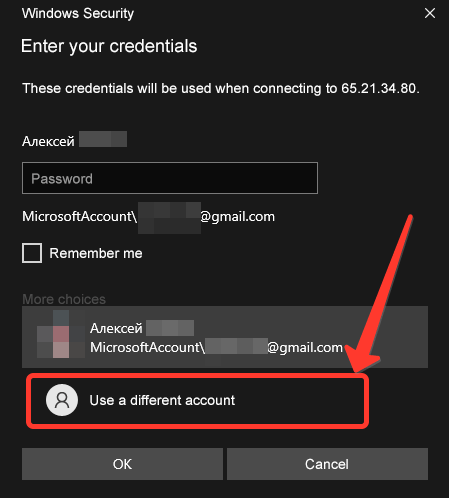
Options will open. Select "Use a different account" and click "OK".
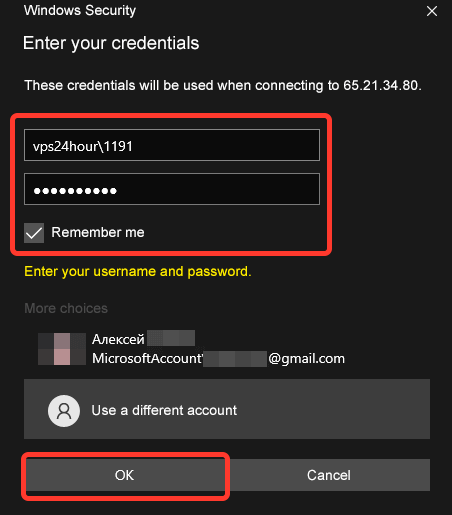
The “Username” and “Password” fields will appear, enter the data received when purchasing the VPS. Check the "Remember me" box and click "OK".
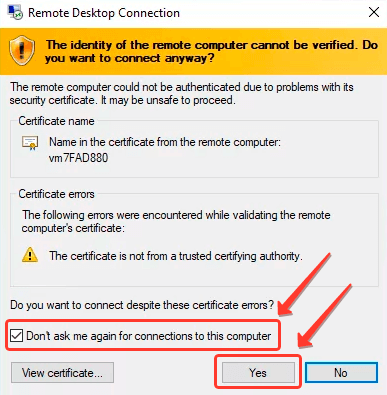
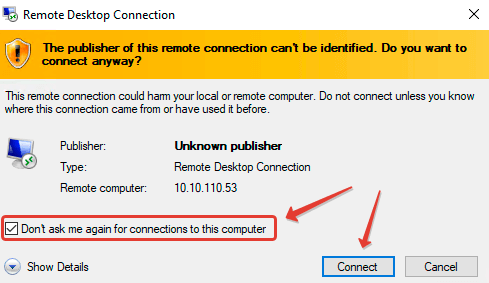
In the next window, check the box “Don’t ask me again for connections to this computer” and click “Yes”.
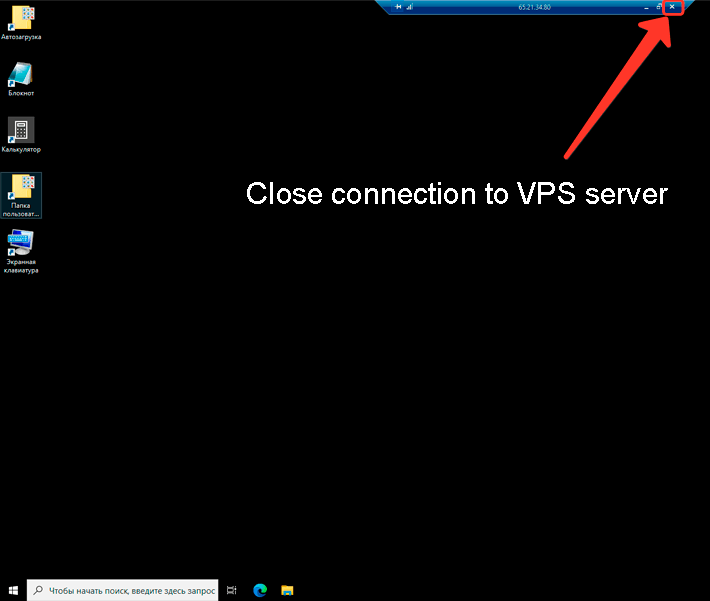
A remote desktop window will open. This is where we will install the Terminal and the bot. For now, let's learn how to properly close a connection to a remote server.
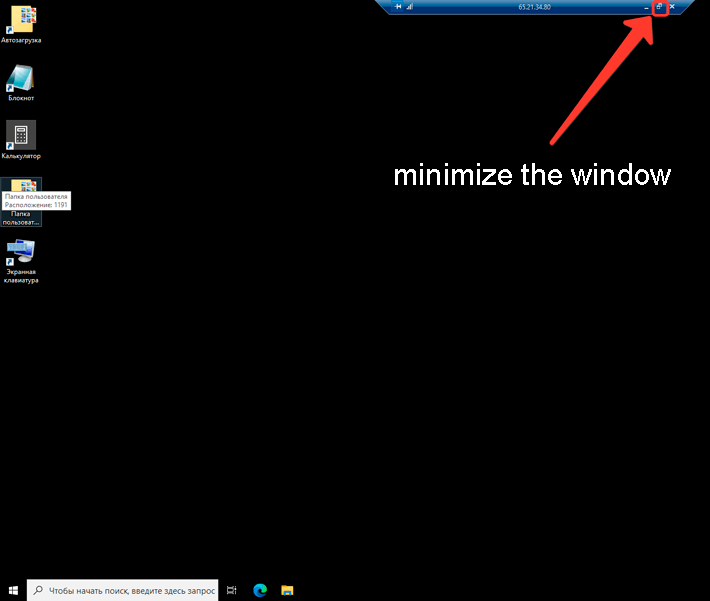
Close the connection to the remote server using the cross in the blue panel at the top where the server IP is indicated. The window will close and your connection to the server will be severed, but the server itself will continue to work, which is what we need! Under no circumstances should you log out of Windows on the server as you do on your home PC. The server must be constantly running 24/7. So you just need to disconnect with him using the cross on the blue panel and nothing else!
We have closed the server's remote desktop window.
4.3 Automating the connection to the VPS server
The procedure for connecting to the server with data entry was lengthy, but you can simplify and automate the connection to the server by creating a shortcut on the desktop of your home PC, through which the window for working with the remote server will open automatically.
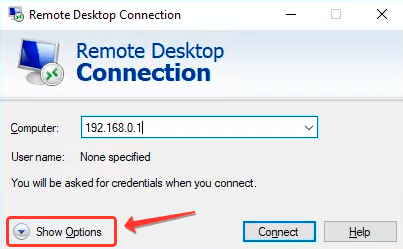
Connecting to the server has already been discussed above, let's repeat the steps: press the WIN keys again (the key with the Microsoft flag) + R. Enter the command "mstsc", click "OK", in the next window "Remote Desktop Connection" click on the "Show Options" button.
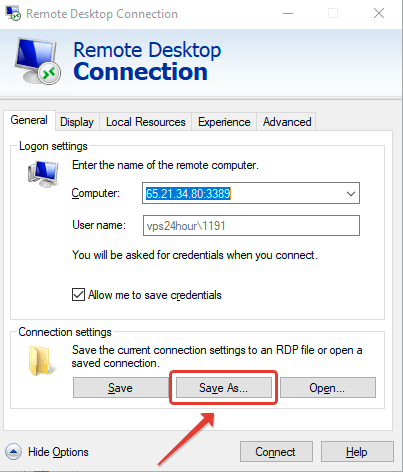
In the parameters that open, on the “General” tab, in the “Connection Settings” section, click on the “Save As” button.
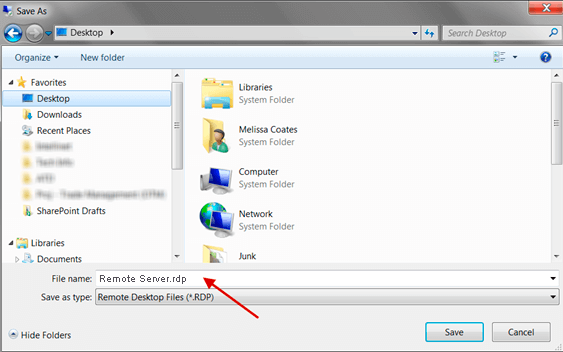
A window will open for you to select a location where to save the shortcut and you can specify a name for the shortcut. Name the shortcut, for example “Remote Server”, select the location where the shortcut will be saved, for example “Desktop” and click the “Save” button.
Our “Remote Server” shortcut will appear on the desktop, and the “Remote Desktop Connection” window can now be closed using a cross. We don't need it anymore. Now we can quickly connect to the VPS automatically by clicking on the “Remote Server” shortcut.
Let's connect to the remote server through our "Remote Server" shortcut. When you first start it, the “Remote Desktop Connection” window will appear, where you need to check the “Don’t ask me again for connections to this computer” checkbox and click the “Connect” button.
This window will no longer be shown when connecting and by clicking on the shortcut you will immediately be taken to the server! We've now made connecting to a remote desktop easier and faster. We're done with automating a quick connection to the server!
4.4 Install the terminal on a remote server
Minimize the remote desktop window and make it smaller for convenience.
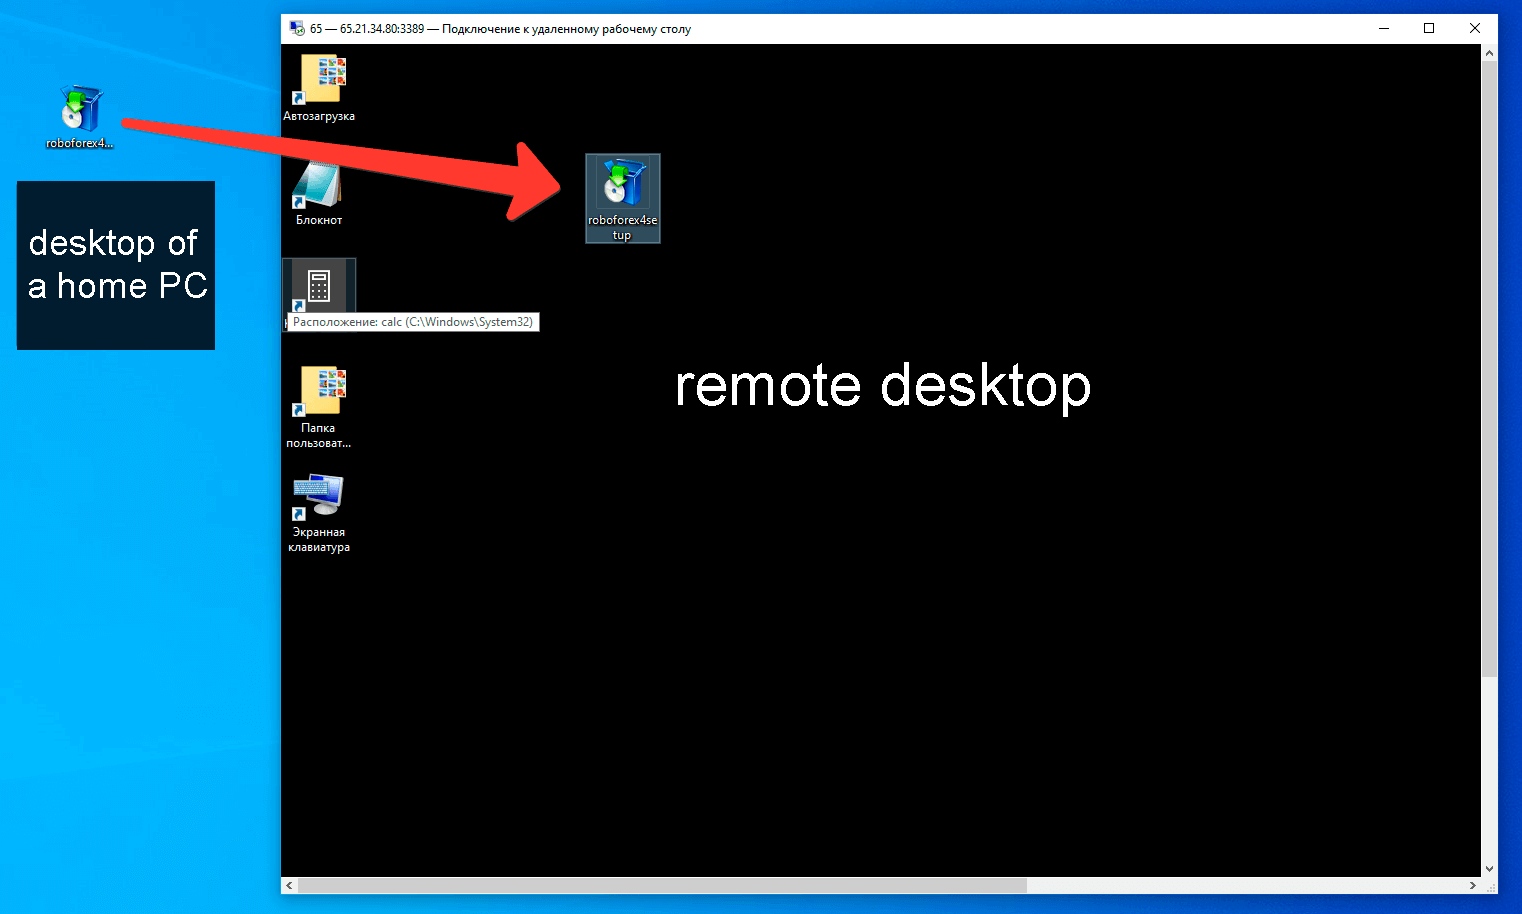
Now we need to copy the terminal installation file “roboforex4setup.exe” to the remote desktop. You will not be able to copy this file by dragging it with the mouse from the desktop of your home PC to the window of the remote server. Use the "Copy" command by right-clicking on the file. And then right-click on the remote desktop and select "Paste". This will copy the terminal installation file to the remote server.
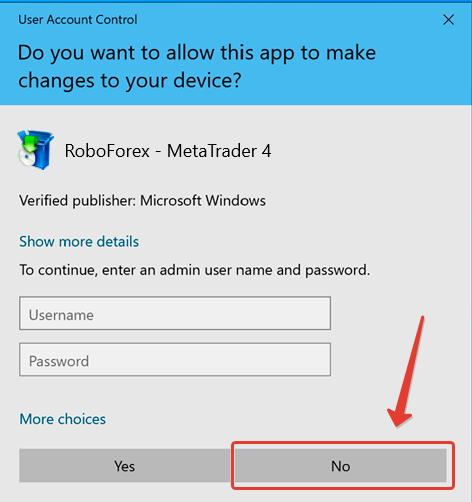
On the remote desktop, run the file "roboforex4setup.exe". A “Allow this app to make changes to your device” window may appear, click “No”.
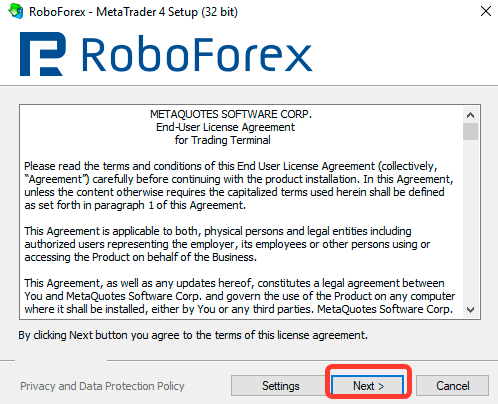
The terminal installation window will appear. Click "Next"
Once the installation is complete, the “Finish” button will appear in the window. Click on it. The installation window will close, on your desktop you will see a shortcut to launch the “RoboForex - MetaTrader 4” terminal, but do not rush to launch it, since the terminal will already launch after you click on the “Finish” button. Launching it for the first time may take quite a long time, just wait.
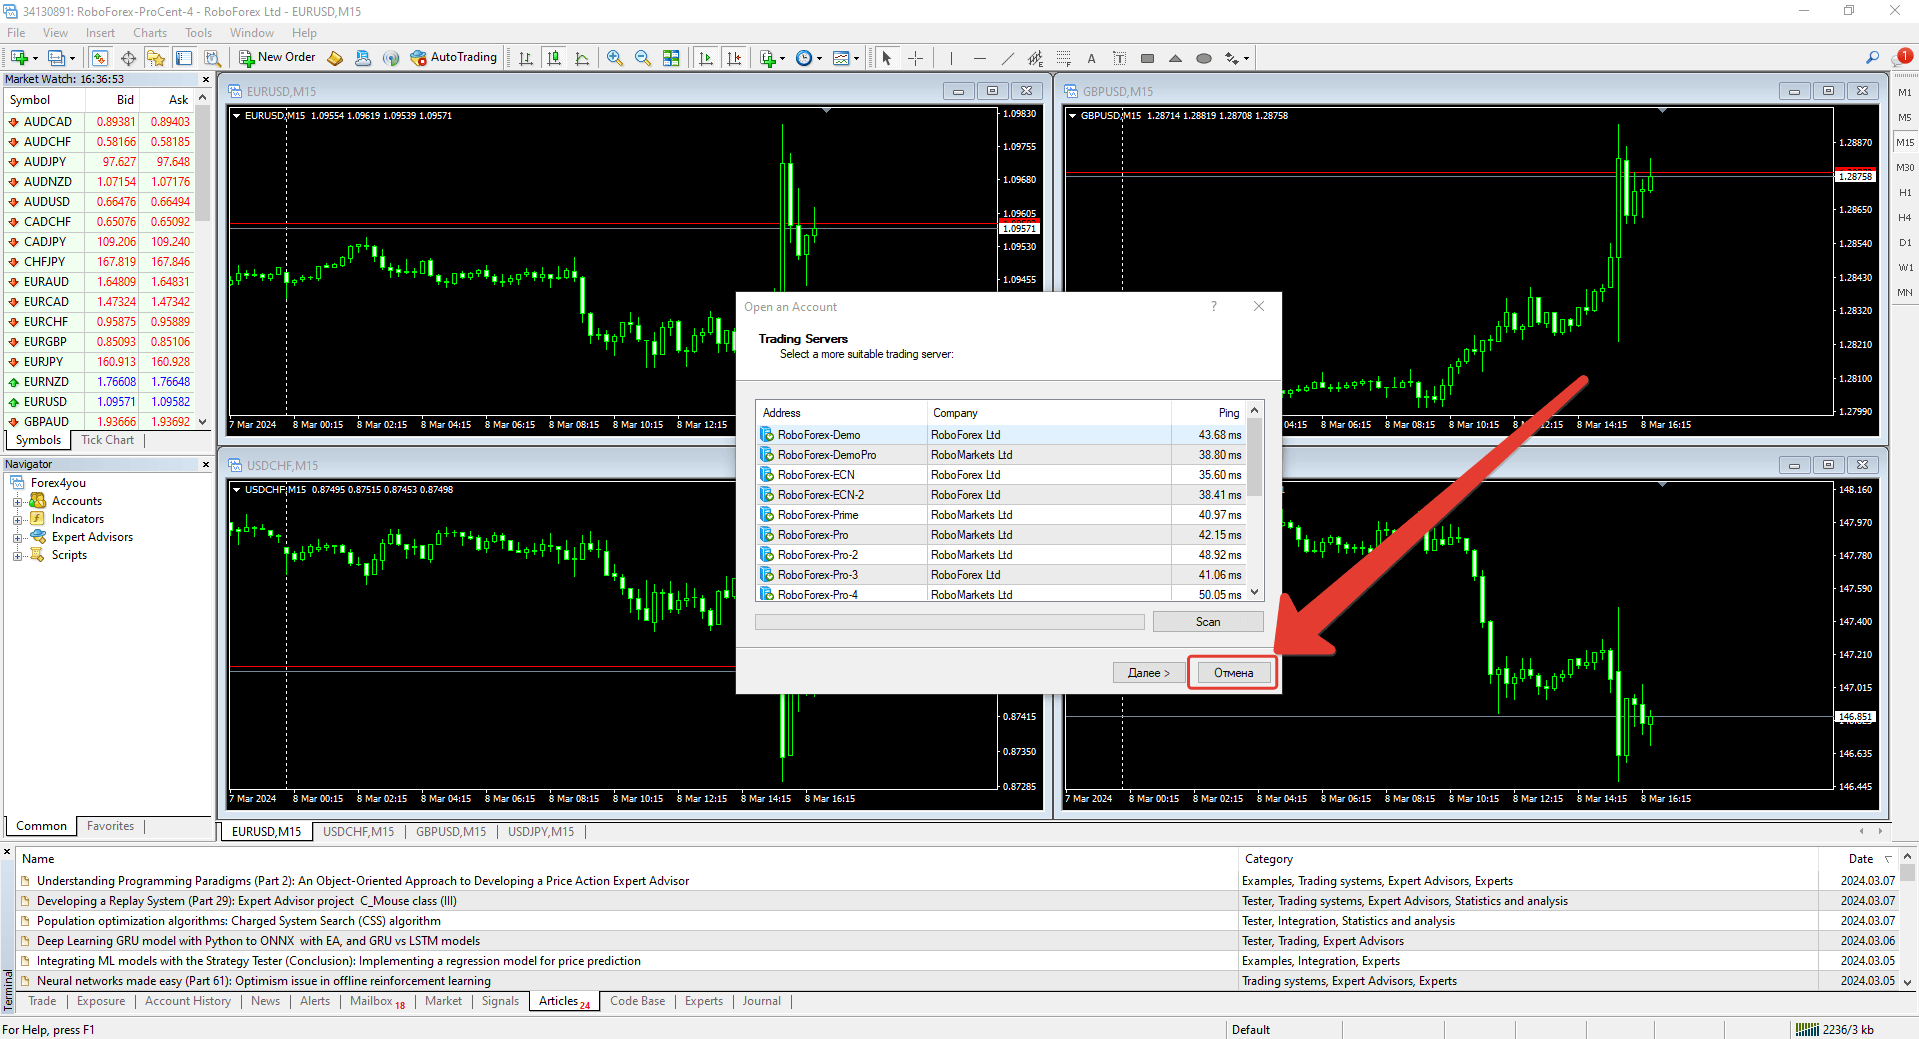
The terminal opened. This is how it looks after the first opening. Close the "Open account" window by clicking on the "Cancel" button.
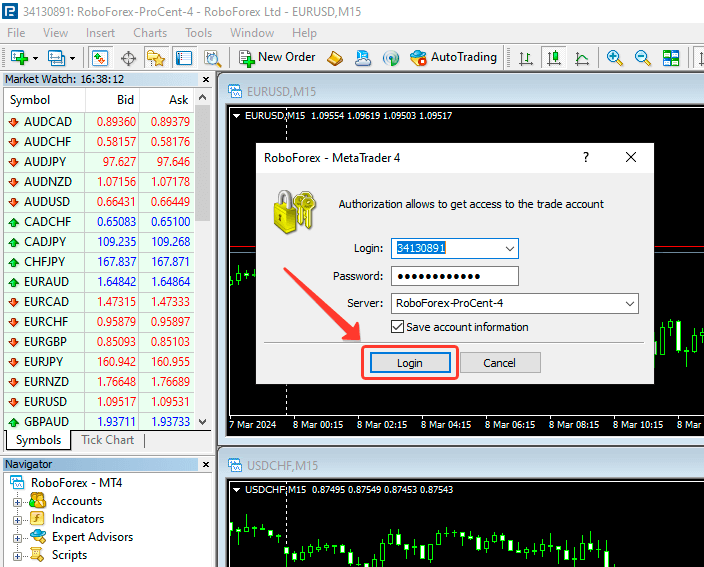
An authorization window will appear. Here you must enter the Login, Password and Server Name received from the broker when opening a trading account. Enter connection details, select Server. The "Save account information" checkbox must be checked. Click the "Login" button.
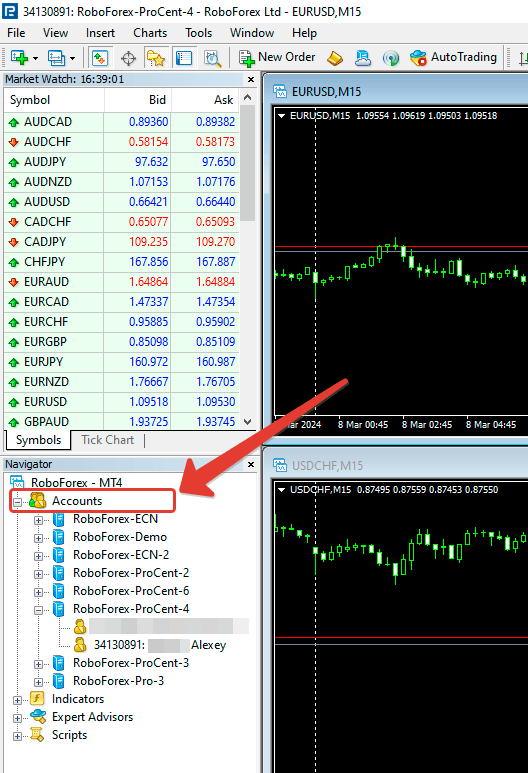
If you successfully connect to a trading account, you will see your trading account number at the top of the terminal, this means that the terminal is currently working with this particular trading account. In the "Navigator" window you see all your trading accounts. After connecting to your account for the first time, it appears and is saved in the “Navigator” window. To add another trading account if necessary, right-click on the “Accounts” section in the “Navigator” window and select the Login to Trade Account” command.
I’ll say right away that in order to trade a bot on two or more trading accounts, you will need to install your own terminal for each trading account and install the bot in it. Those. 1 trading account = 1 terminal = 1 bot.
4.5 Terminal setup
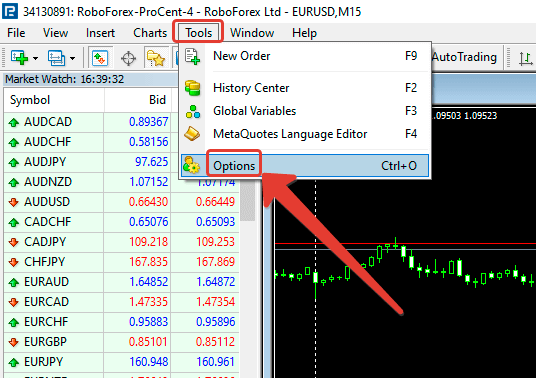
In the main menu, select "Tools" and in the drop-down menu select "Options".
In the "Options" window that opens, select the "Expert Advisors" tab and check the boxes for "Allow automated trading" and "Allow DLL imports" as in the screenshot. Click "OK".
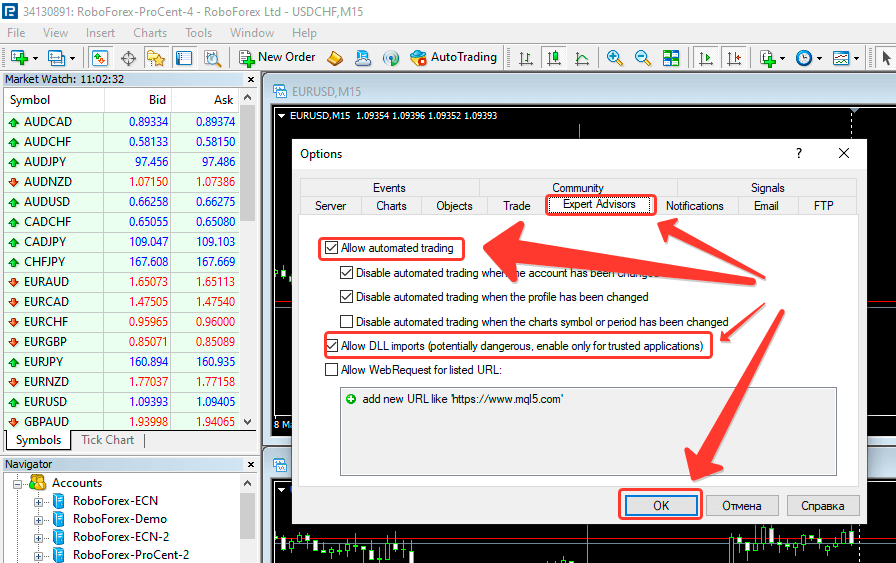
Congratulations, the terminal is ready for use!
-
Step 5: Install and configure the Leprechaun bot
5.1 Download the bot file from the website
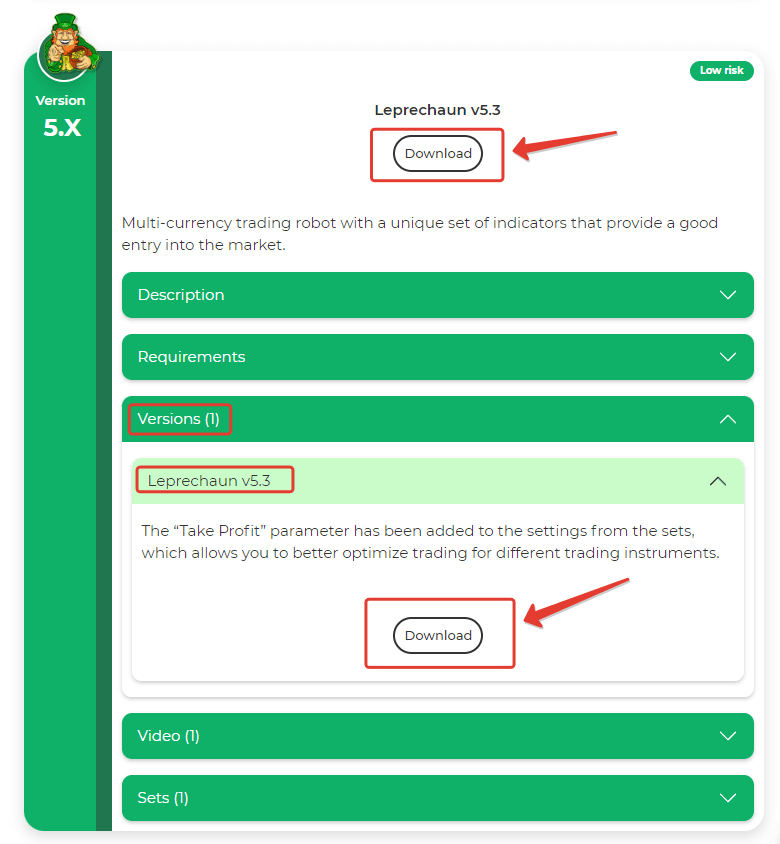
Download from the website https://leprechaunbot.ru/en/ any version of the Leprechaun bot to your computer.
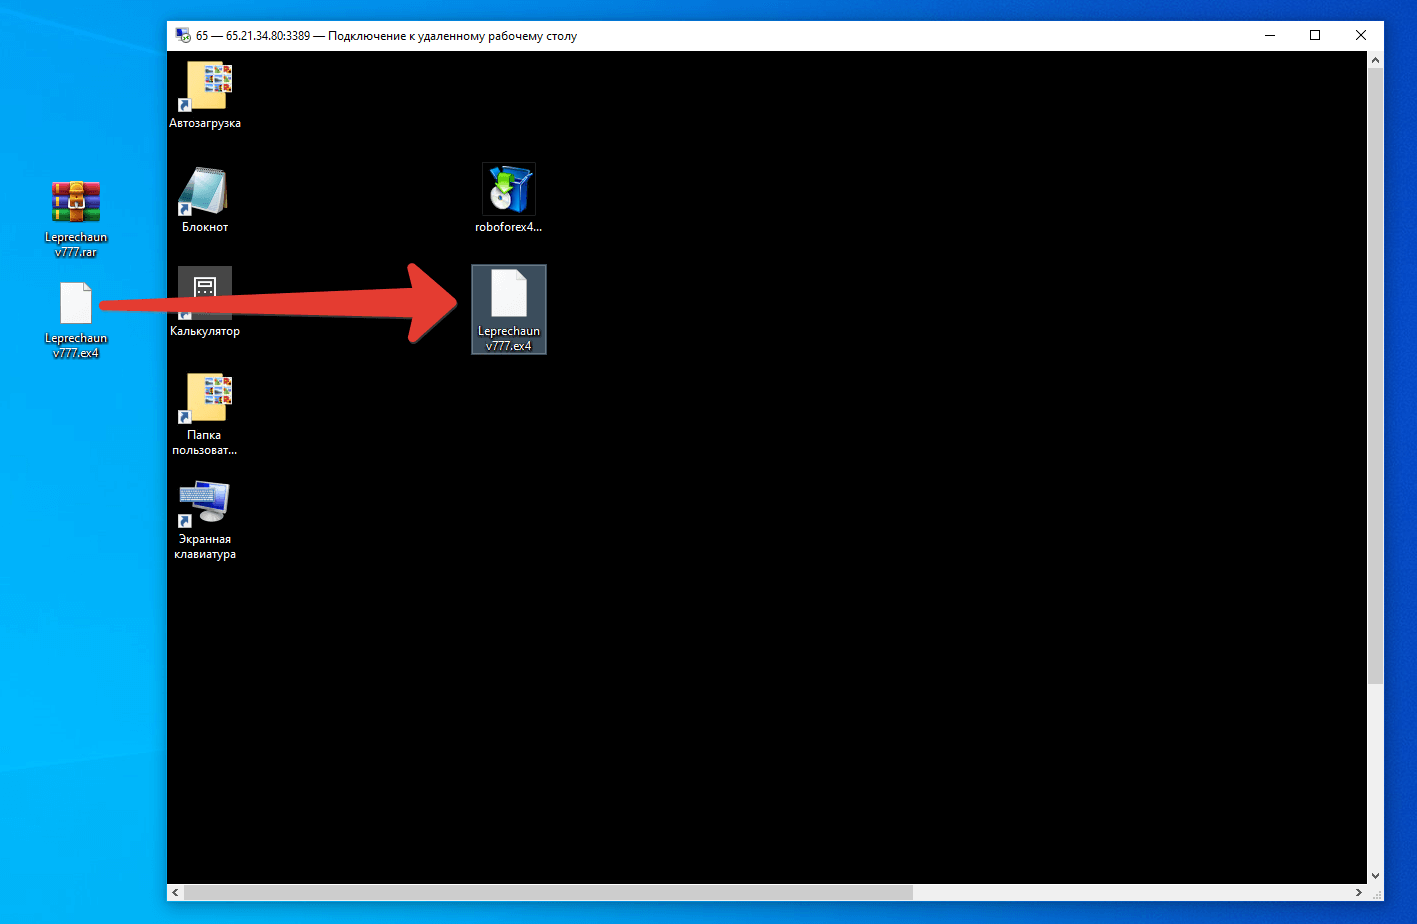
Unzip the downloaded archive. Copy the bot file with the extension "*.ex4" to the remote desktop, just as we did with the terminal installation file using the copy method.
5.2 Opening the required chart of the trading instrument
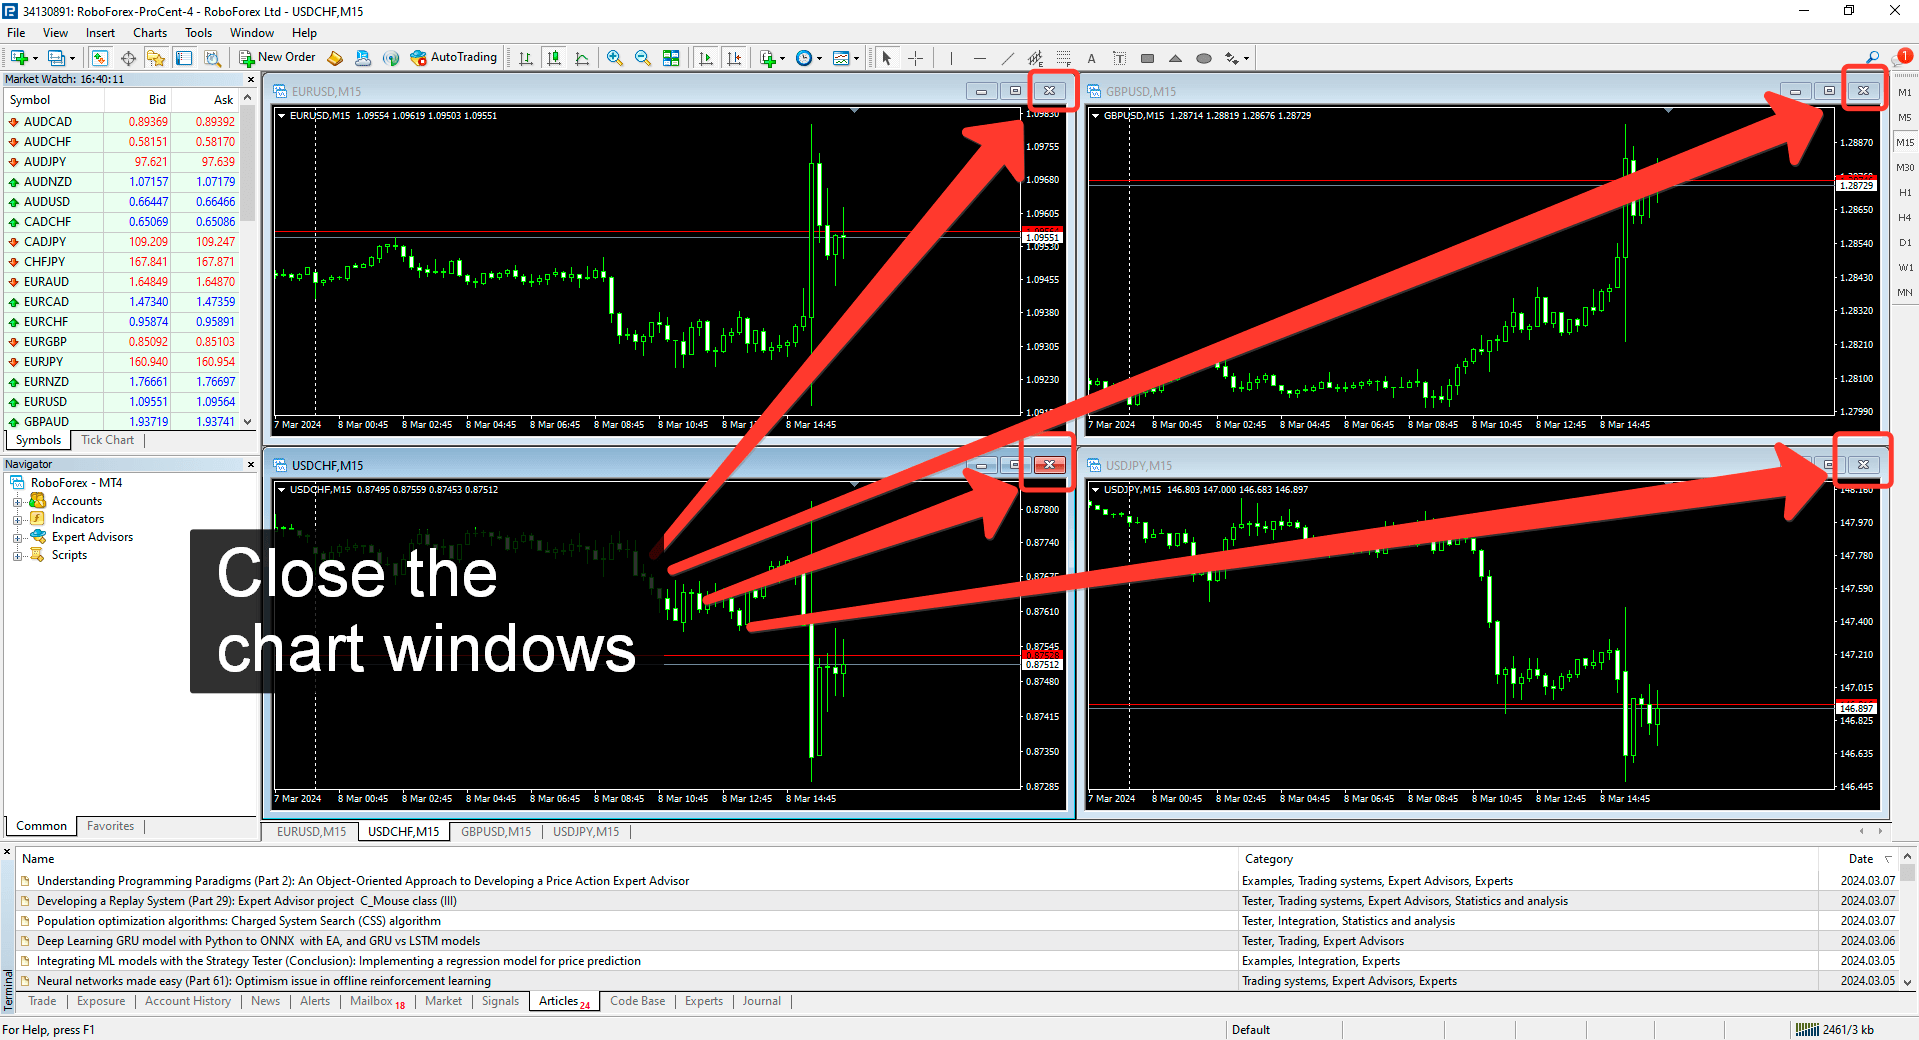
Open the terminal. Close the chart windows in the terminal by clicking the button with a cross in the upper right corner of each chart window.
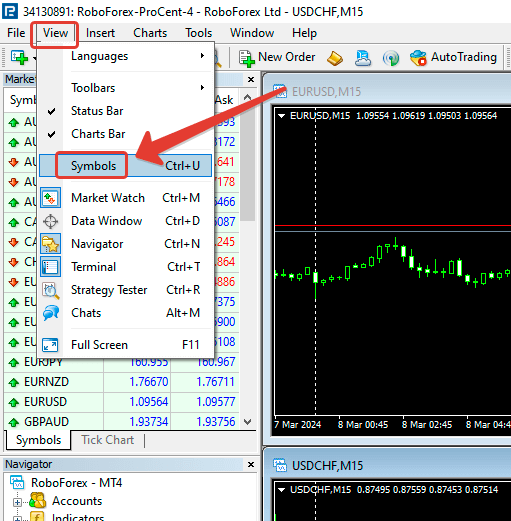
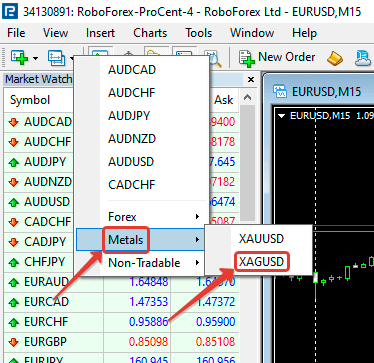
In the example, I will install the Leprechaun bot version 777. His default settings are made for the trading instrument - Silver (XAGUSD). In order for this chart to be available in the terminal, you need to make several settings. In the main menu, select "View" and in the drop-down menu, select "Symbols".
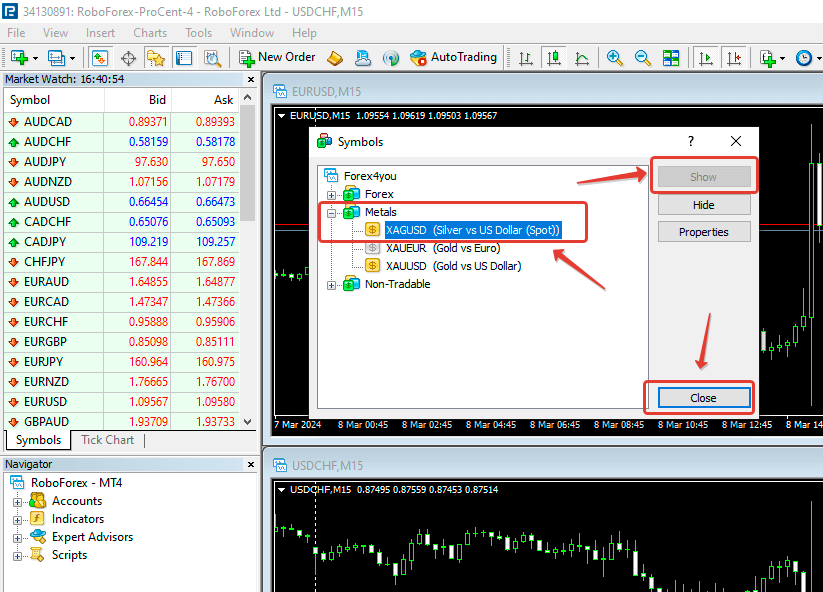
In the window that opens, expand the "Metals" section and select "XAGUSD", then click on the "Show" button. The "XAGUSD" item will then be highlighted in yellow. Click the "Close" button.
Now let's open the XAGUSD chart needed for the bot. The main menu, the "File" item in the drop-down menu, select "New Chart".
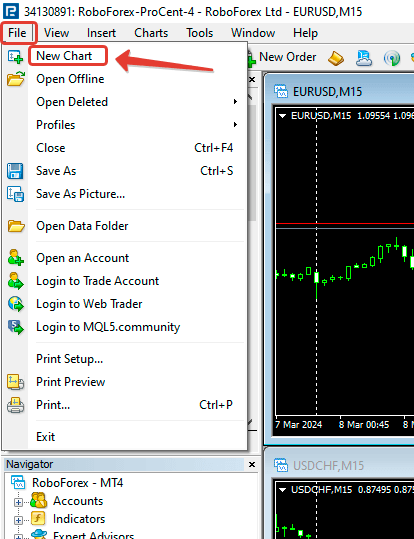
In the list of trading instruments that appears, in the "Metals" section, select the "XAGUSD" tool. After that, you will see a window with the XAGUSD graph, the name of XAGUSD should be written in the upper left corner of the graph. Be careful not to install the bot on the chart of another trading instrument for which the bot is not configured. Expand it to the entire free area with the corresponding button in the upper-right corner of the chart window.
5.3 Installing the bot in the terminal
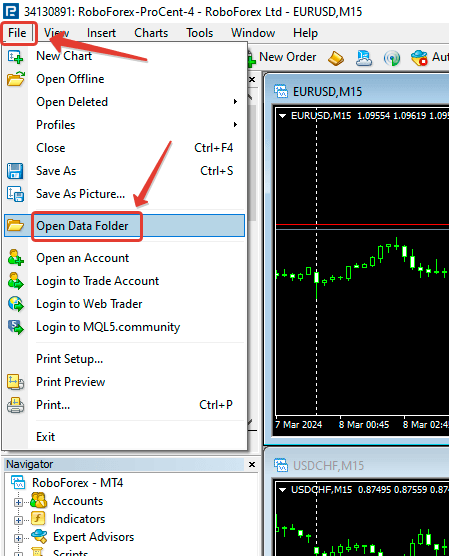
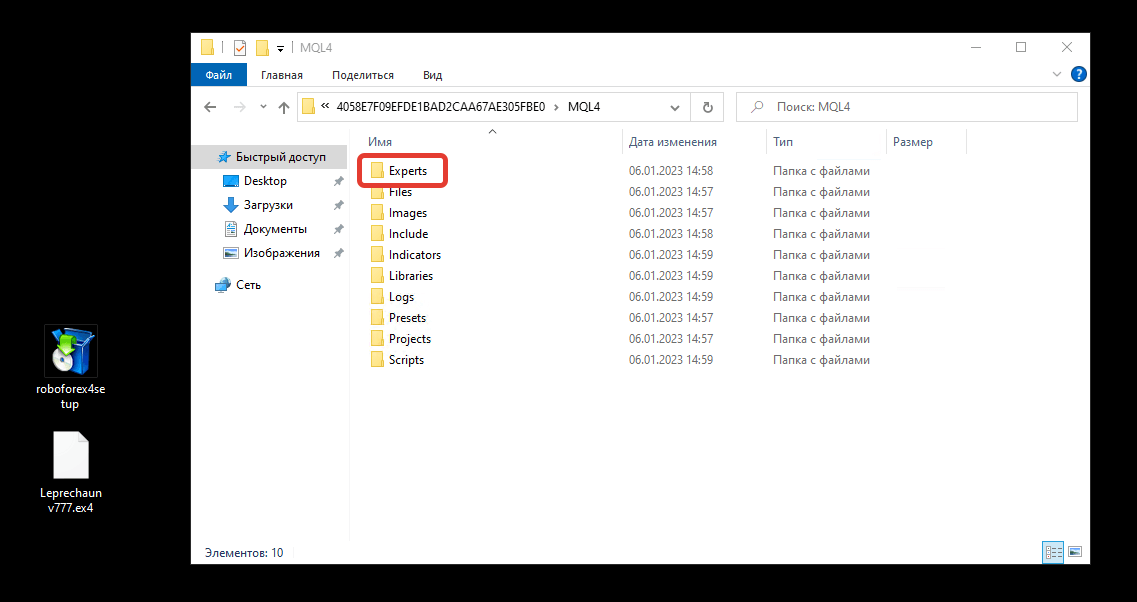
Now let's add the bot to the terminal. To do this, the previously transferred bot file "Leprechaun v777.ex4" must be added to the service folder of the terminal "Experts". To get to this folder, select the "File" item in the main menu from the "Open Data Folder" drop-down menu.
The terminal root directory with service folders will open. Go to the "MQL4" folder. Minimize the terminal for now.
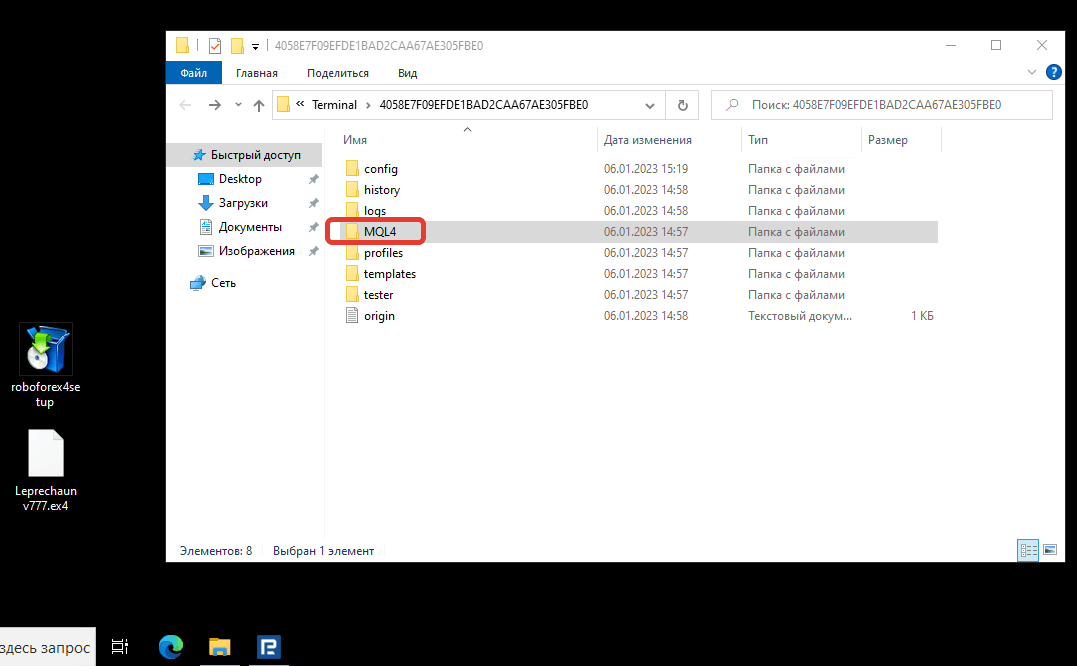
In the "MQL4" folder, find the "Experts" folder and go to it.
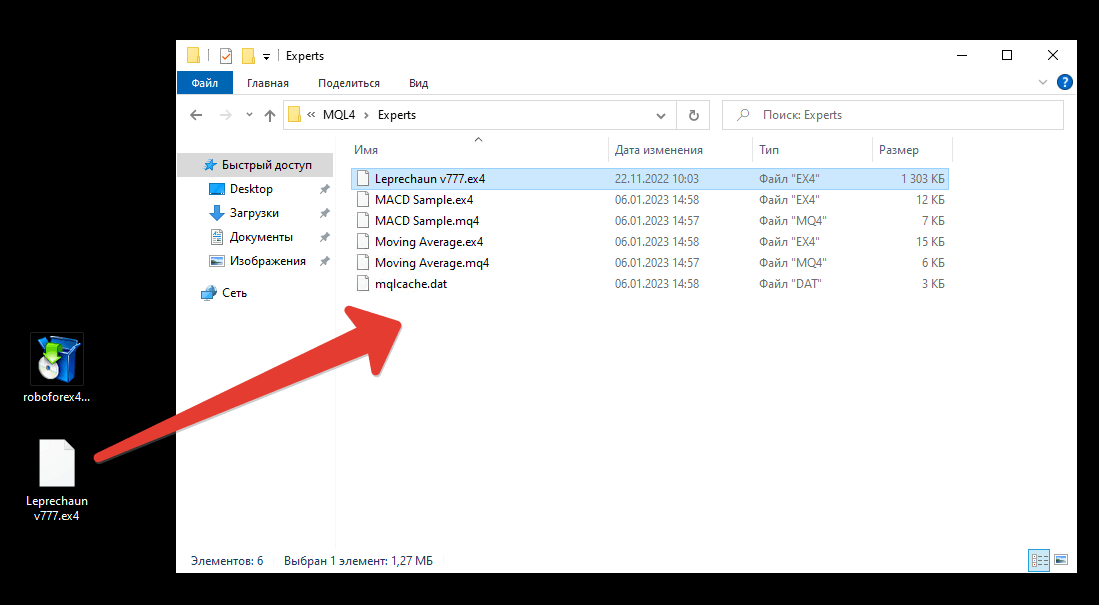
Transfer or copy the bot file "Leprechaun v777.ex4" from the server desktop to the "Experts" folder. Close the folder. Open the terminal.
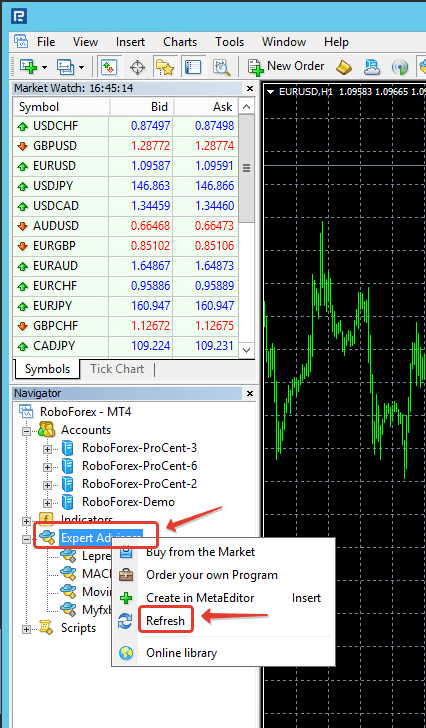
All bots installed in the terminal are displayed in the Navigator window in the Expert Advisors section. In order for only the installed bot "Leprechaun v777.ex4" to appear in this list of advisors, you must either restart the terminal or right-click on the "Expert Advisors" section and select the "Refresh" command.
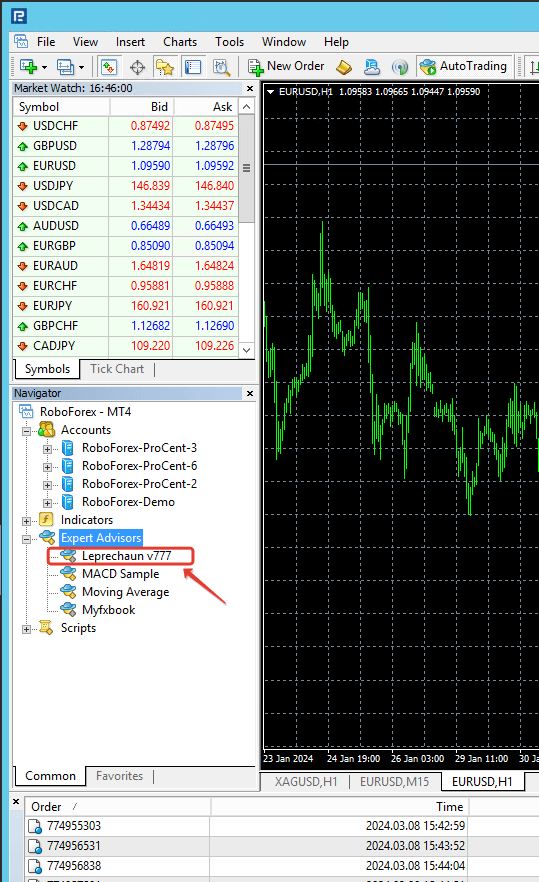
After that, our bot will appear in the "Expert Advisors" section and we will be able to use it in trading.
5.4 Installing the bot on the trading instrument chart
In order for the bot to trade, it must be installed on the chart of the trading instrument. In our case, we will set it to the XAGUSD silver chart. With the left mouse button, take the name of the bot in the Navigator window and, without releasing the mouse button, drag it onto the silver graph, release the mouse button. The bot settings window will appear.
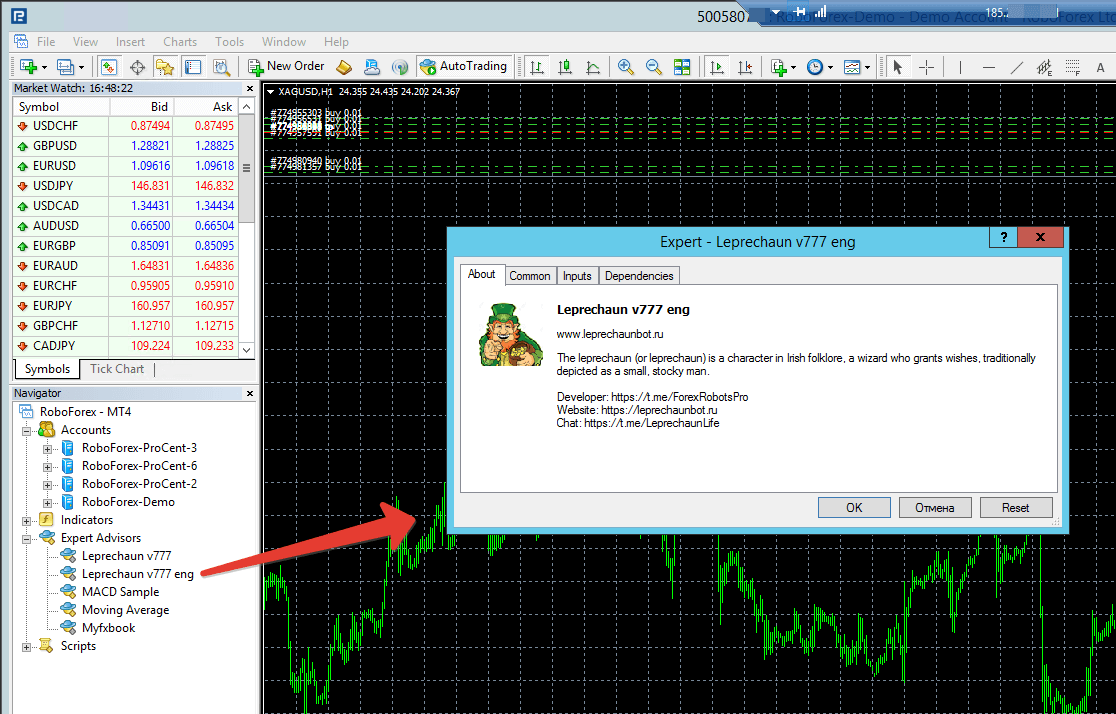
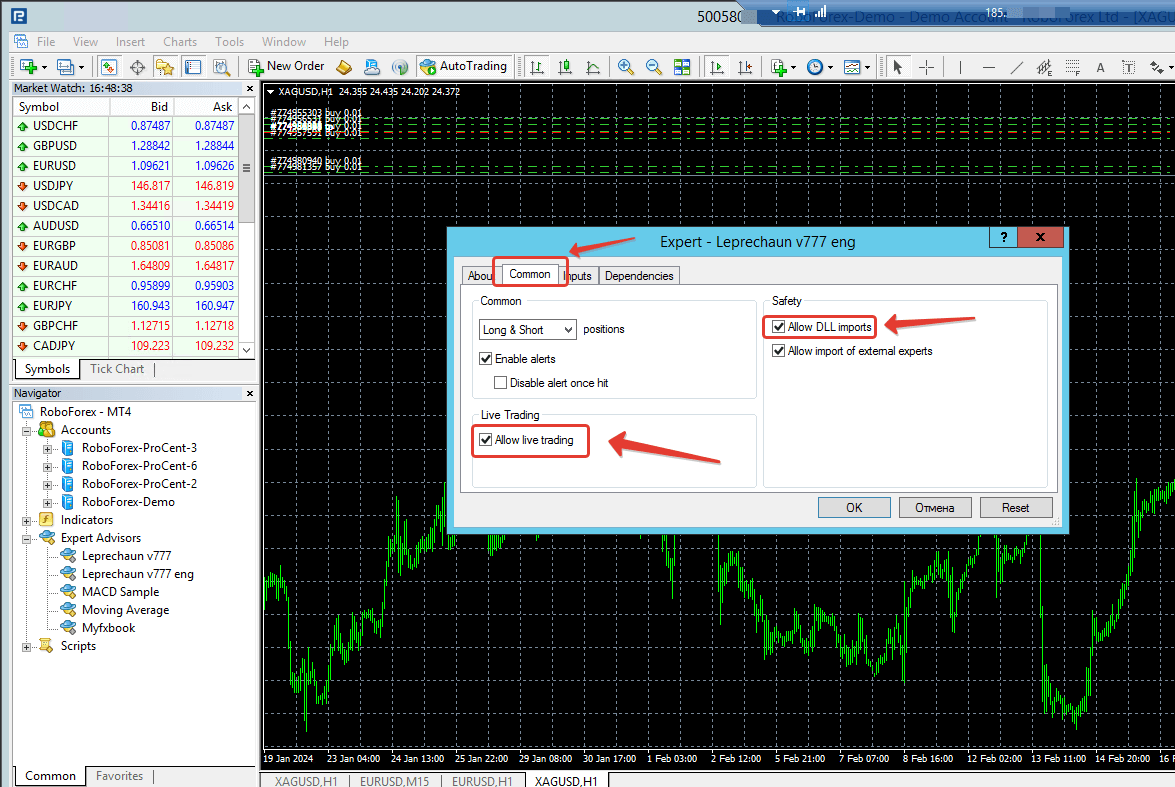
In this bot settings window, go to the "Common" tab. Check the box "Allow live trading" and "Allow DLL import". Click the "OK" button.
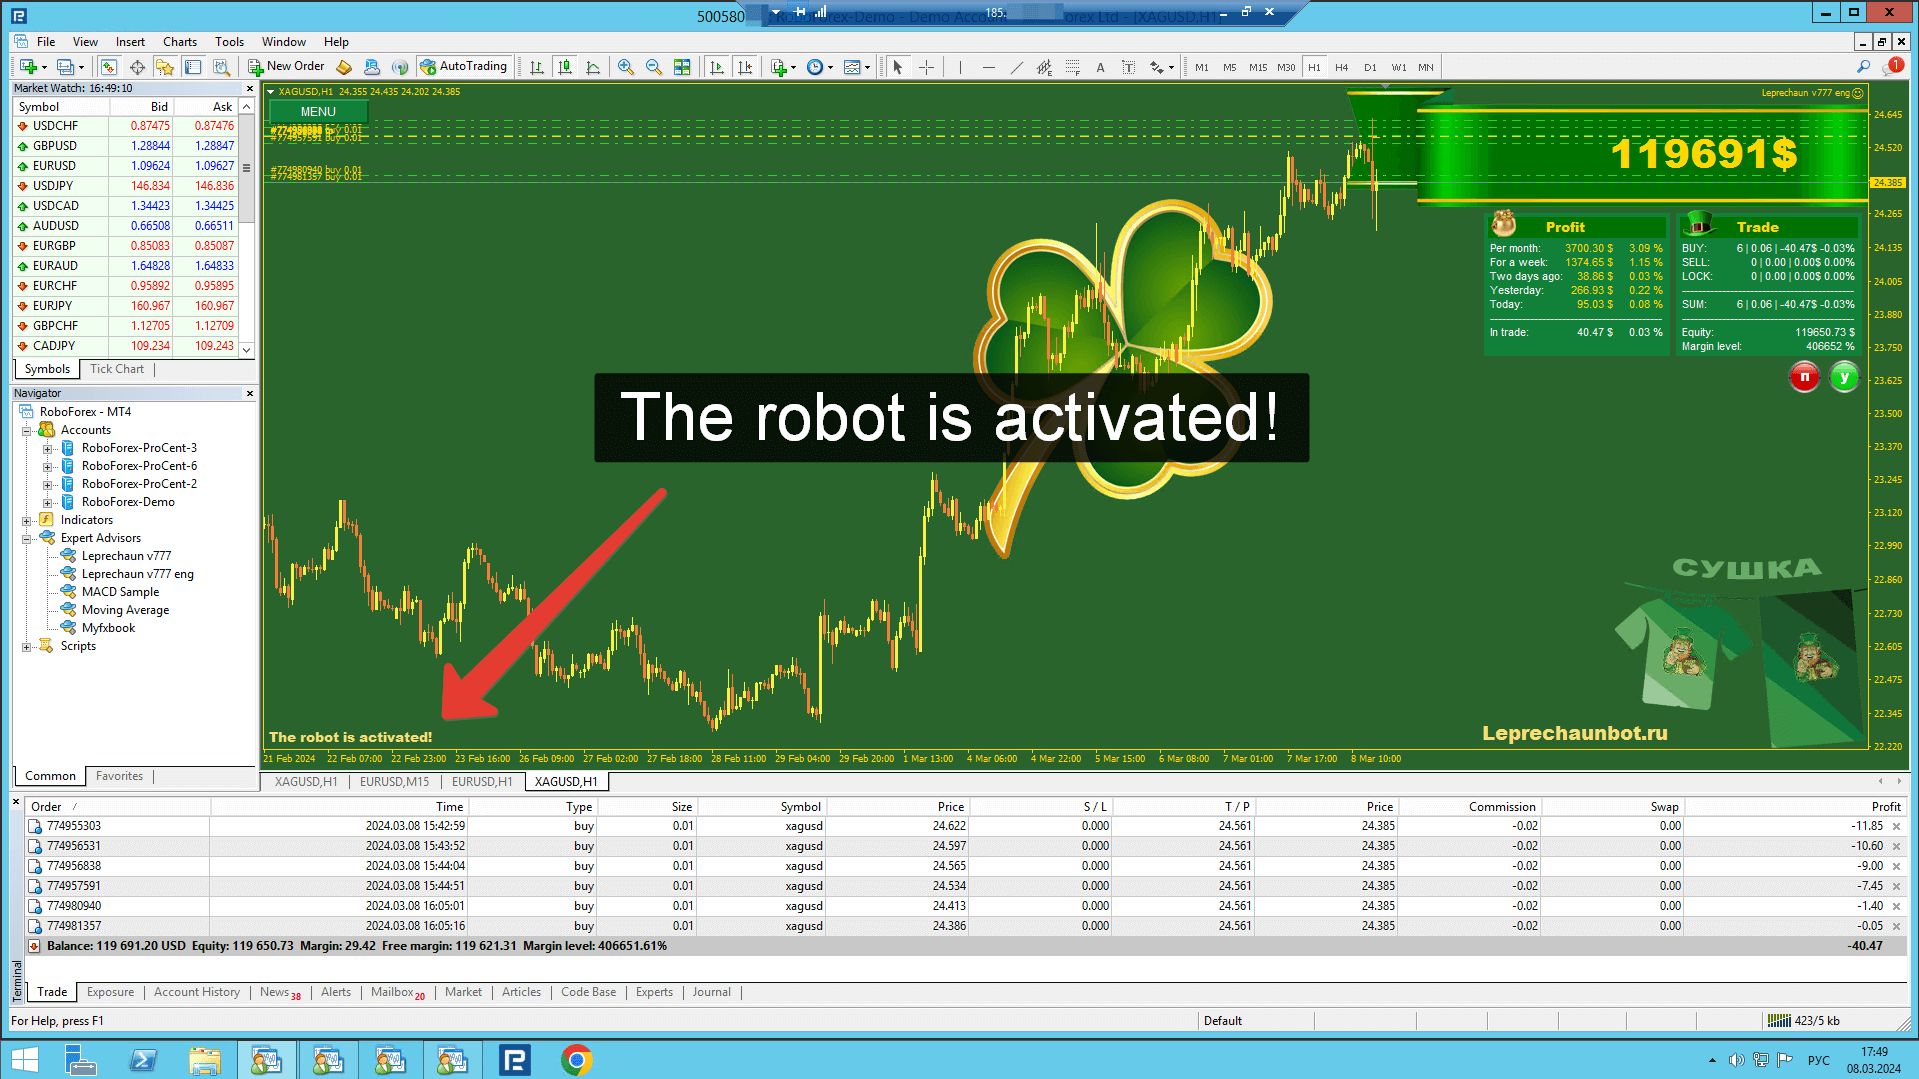
The bot will load on the chart. In the lower left corner of the chart, the bot displays information on the activation of the trading account. In order for the bot to trade, the inscription must be "The robot is activated!". Let me remind you that Leprechaun bots are activated automatically when you open a trading account with the wins affiliate code, so when you install the bot on your open account, it is already activated.
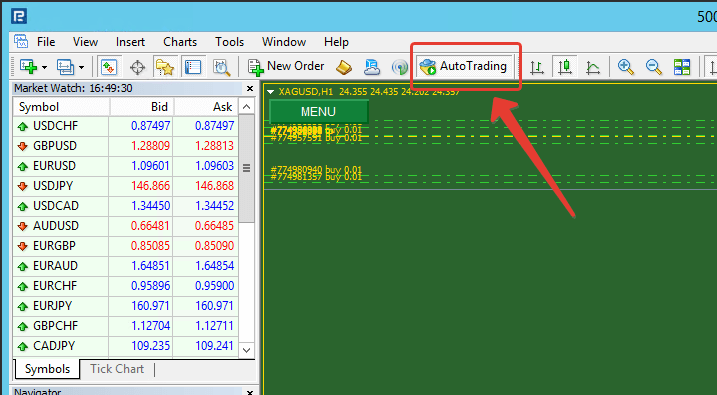
In order for the bot to be allowed to perform trading operations in the terminal, the "AutoTrading" button must be pressed and its icon had a green ball (not red). If this is not the case, click on the "AutoTrading" button so that it is depressed.
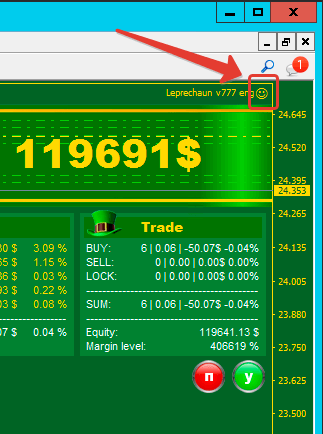
In order for the bot to be allowed to perform trading operations in the terminal, make sure that the smiley face next to the name of the bot in the upper right corner of the chart smiles. If he is not smiling, then it is necessary to check the box "Allow live trading" and "Allow DLL import" in the bot settings in the "Common" tab. You can open the Adviser settings window from the context menu by right-clicking on the "Advisers" -> "Properties" graph or by pressing the "F7" hotkey.
Congratulations! You have completed all 5 steps! The bot is ready to trade! Happy trading!